
1. What is Angular?
Angular, developed and maintained by Google, has become a JavaScript staple for building scalable web applications. Its tools and features, like two-way data binding and dependency injection, simplify development. By embracing component-based architecture and MVC patterns, Angular enables developers to build high-performance applications. An examination of its history reveals Angular’s significant impact on web development.
The history of Angular’s birth
In order to understand the background of Angular’s birth, it’s necessary to look back at the history of web pages. In the past, there was no JavaScript and Ajax. If users clicked a button, it made a page request to the server, and the server sent back the updated page. As a result, it was difficult to manage the application’s state and took lots of time to upload the page.

Before the advent of JavaScript and Ajax
In order to relieve the inconvenience of continuing to request the existing page, the term Ajax was introduced in 2005, and data has been requested rather than continuously requesting the entire page. Initially, the page is requested in the same way, but subsequent data requests are made asynchronously. At this stage, the ability to receive data in formats such as XML and manipulate the data within the web page became essential. This involves making asynchronous requests for XML data and then updating the document object model (DOM) to refresh the display.

After the advent of JavaScript and Ajax
Google actively uses this Single-Page Application (SPA) technology, which requests pages only once, to develop browser-based applications. However, using only JavaScript led to excessive complexity and bloated code. While Miško Hevery was working on the Google Feedback project with two other developers, he found SPA technology needed to be simpler. He developed a new library that significantly reduced the project’s codebase from 17,000 lines (using Google Web Toolkit) to 1,500 lines in just two weeks. This library is now known as Angular.
Angular vs AngularJS
AngularJS means the first version created, while Angular usually refers to the versions released after the second version. Due to significant changes, updating from AngularJS to Angular isn’t straightforward. Here are some key changes:
1) Mobile-friendliness by using Typescript instead of JavaScript
As the name suggests, Angular replaces JavaScript with TypeScript. Angular uses TypeScript, a statically typed superset of JavaScript, to enhance code readability and maintainability. The advantage of TypeScript is its static typing, which helps catch mistakes before production. It is also easy to read and supports JavaScript libraries.
Additionally, this transition has allowed developers to reuse up to 90% of the code from web applications in mobile development, thanks to TypeScript being used in NativeScript, a mobile framework for building cross-platform mobile apps (https://www.mantrax.io/mobile-app-development/). By mastering Angular, developers can apply the same coding skills to mobile app development, significantly simplifying the process. This convergence of web and mobile development offers new opportunities, making it easier for developers to venture into mobile app creation and address fresh challenges.
2) Architecture and Building Blocks in AngularJS and Angular
AngularJS employs a Model-View-Controller (MVC) design pattern that divides the architecture into three main components:
-
- Model: Manages data storage and backend logic.
-
- View: Handles the front-end display through user-friendly interfaces (HTML with AngularJS directives).
-
- Controller: Mediates and coordinates data between the Model and View, by handling user input and interactions.
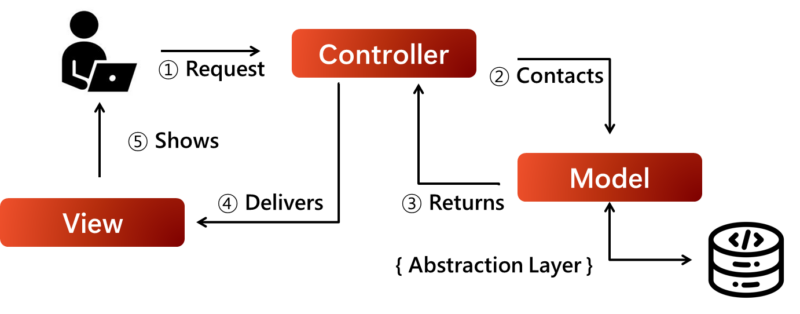
In addition to the MVC pattern, AngularJS allows developers to create reusable code pieces using directives, which are HTML extensions assigning specific behaviors to elements. AngularJS supports two-way data binding, allowing automatic synchronization of data between the model and the view. This approach, often described as Model-View-Whatever (MVW), enables a flexible structure for developing complex applications.
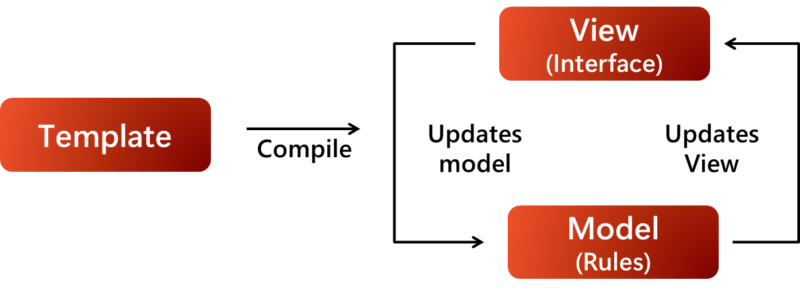
Angular, the successor to AngularJS, retains these standard directives but further introduces self-sufficient, reusable components as its primary architecture. While inheriting the MVC concept, Angular evolves it by introducing components as the fundamental building blocks. A component in Angular is a directive linked to an HTML template that defines what renders on the page. This component-based architecture not only makes the code more modular and maintainable but also enhances reusability across different parts of the application.
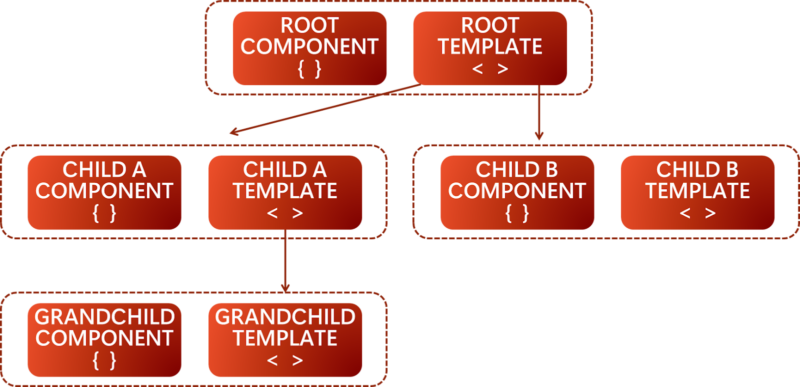
As front-end applications grew in complexity, developers borrowed the MVC pattern from back-end development to impose structure. However, the clear separation of view and controller on the server-side wasn’t replicated on the client-side, leading to a blurring of lines. In AngularJS, the controller was even created by the view, violating the single responsibility principle. Hence, Angular shifted towards a component-based approach, where independent UI features with their own structure and APIs could be easily reused, tested, and updated without refreshing the entire page. By combining components on the same level – the view level – it offered a more efficient alternative to the layered MVC architecture.
3) Command Line Interface (CLI)
AngularJS does not have a built-in command line interface (CLI). In contrast, Angular has its own CLI that allows for the quick generation of components, services, directives, and more.
The Angular Command Line Interface (CLI) simplifies the development process with commands for generating components, services, and other application elements. It ensures a consistent project structure and minimizes boilerplate code.
Every Angular command starts with these magic letters: ng. For example, creating a new component is as simple as:
$ng generate component my-componentBesides generating components, the CLI can also be used to generate:
-
- Modules ng generate module <PATH> or shorthand ng g m <PATH>
-
- Components ng generate component <PATH> or ng g c <PATH>
-
- Interfaces ng generate interface <PATH> or ng g i <PATH>
-
- Services ng generate service <PATH> or ng g s <PATH>
-
- Interceptors ng generate interceptor <PATH>
-
- Directives ng generate directive <PATH> or ng g d <PATH>
-
- Pipes ng generate pipe <PATH> or ng g p <PATH>
-
- etc.
Upon generating a component, the CLI will create all required files (template, styles, typescript, and test file) and also wire up the component to its nearest module.
If unsure what a command does, the Dry-Run command could be used to print to the console what the command will do.
$ng generate … -dry-run2. What is Angular in web development?
Angular is commonly used in web development because its key features make debugging and code reuse easier. Here are two key features of Angular:
1) Dependency Injection
Dependency Injection is a design pattern in which a class obtains its dependencies from external providers instead of instantiating them on its own. This method allows for greater flexibility and modularity in application development.
Dependencies are connections between different parts of the code. Traditionally, each object in the codebase constructs its own dependent objects, meaning that if a dependency changes, the object using it must also be modified. Angular simplifies this by using injectors to connect objects to dependencies stored in a central location, improving code reusability and testability.
For example, instead of manually creating instances:
const dataService = new DataService();In this case, an instance of the ‘DataService’ class is directly created, which is simple but has several drawbacks. If the ‘DataService’ class changes, all code that uses it must also be modified. Additionally, if ‘DataService’ requires other dependencies like ‘HttpClient’ or ‘LoggerService’, each dependency must be manually provided, complicating testing and maintenance. This is an example where ‘DataService’ requires other dependencies:
const dataService = new DataService(new HttpClient(new LoggerService());Angular manages dependencies behind the scenes using providers, typically within component modules. This approach offers several benefits:
-
- Components do not need to know where their dependencies come from.
-
- Dependencies can be easily replaced or mocked, facilitating easier testing.
-
- If the dependency we’re instantiating also depends on something, we need to provide an instance of that as well.
Injecting Dependencies
In Angular, there are two main ways to inject dependencies:
-
- Constructor Injection: This is the default approach and is used in class-based files. The syntax is as follows:
@Component({
  selector: 'app-root',
  templateUrl: './app.component.html',
  styleUrls: ['./app.component.scss'],
})
export class AppComponent {
  constructor(private readonly apiService: APIService) {}

  fetchDataAndSave() {
    const data = this.apiService.fetchData();
    this.apiService.saveData(data);
  }
}-
- Inject Function : Recently introduced, this function can be used in guards, resolvers, and other components:
export class AppComponent {
  private readonly apiService: APIService = inject(APIService);

  fetchDataAndSave() {
    const data = this.apiService.fetchData();
    this.apiService.saveData(data);
  }
}
Providers
Every injected dependency must be specified within a provider. Components can have their own providers defined as follows:
@Component({
  selector: 'app-root',
  templateUrl: './app.component.html',
  styleUrls: ['./app.component.scss'],
  providers: [DataService]
})
export class AppComponent {
  constructor(private readonly dataService: DataService) {}
}
Component-Level Providers
Dependencies can also be set up in a module, making them accessible to any component, directive, or pipe within that module:
@NgModule({
  declarations: [AppComponent],
  imports: [BrowserModule, AppRoutingModule, HttpClientModule],
  providers: [DataService, LoggerService],
  bootstrap: [AppComponent]
})
export class AppModule {}
Module-Level Providers
Alternatively, the `providedIn` property can be utilized within the Angular service itself. This approach eliminates the need to manually configure providers in modules or components. By setting `providedIn: ‘root’`, Angular ensures that the service is automatically provided in the root module (AppModule).
@Injectable({
  providedIn: 'root' // can also use 'any' or 'platform'
})
export class DataService {}
Using providedIn Property
Providers in Angular handle the creation and distribution of dependencies. By setting them up at different levels, Angular simplifies dependency management and improves code modularity, testability, and maintainability.
2) Directives
Directives are a fundamental part of Angular, enabling the extension of HTML’s capabilities by attaching specific behavior to DOM elements. They essentially allow HTML to create dynamic content and add new or modify existing behavior in templates. It must be declared in Angular Modules just like components.
Types of Directives
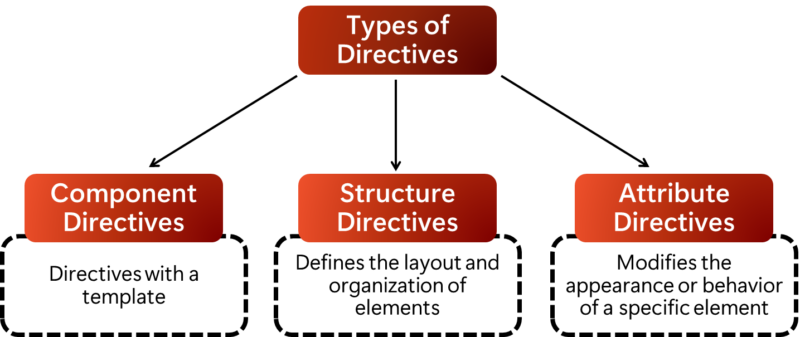
Component Directives:
Component Directives are the most commonly used directives. They transform an HTML element into a reusable component, guiding the component’s behavior and usage at runtime. Essentially, Component Directives include both logic and template, making them reusable components. In contrast, the other two directive types of directives, attribute and structural, modify existing elements and behaviors but do not include templates.
Here’s a basic example of a component directive in Angular. The ‘UserGreetingComponent’ shows a greeting message with the name “Angular”.
import { Component } from '@angular/core';

@Component({
    selector: 'app-user-greeting',
    template: `
        <p>Hello, {{ name }}!</p>
    `,
    styles: ['p { color: blue; }']
})
export class UserGreetingComponent {
    name: string = 'Angular';
}
In ‘app.component.html’:
<app-user-greeting></app-user-greeting>Structural Directives:
Structural directives modify the DOM layout by adding or removing elements. ‘ngIf’, ‘ngFor’ and ‘ngSwitch’ are examples of structural directives in Angular. This is different from attribute directives, which only modify the appearance or behavior of an element. For instance, ‘ngIf’ controls the visibility of elements based on a condition:
<div *ngIf="isLoggedIn">
  Welcome back, user!
</div>
<div *ngIf="!isLoggedIn">
  Please log in.
</div>
‘ngFor’ is used to display a list of items by iterating over them:
<ol>
  <li *ngFor="let item of items">{{ item.name }}</li>
</ol>
Attribute Directives:
Attribute directives change the appearance or behavior of an element. ‘ngClass’, ‘ngStyle’, and ‘ngModel’ are examples of attribute directives. For example, ngClass dynamically assigns CSS classes:
<button [ngClass]="{'active': isActive, 'disabled': !isActive}">Click Me</button>To use built-in directives, it is necessary to import CommonModule in the component’s module, similar to how FormsModule is used for forms.
Other Useful Directives:
-
- Ng-Content: Passes HTML content or a component from a parent to a child component, similar to sharing content between components, similar to props.children in React.
-
- Ng-Container: Acts as a content wrapper, like the <div> tag, but it is not rendered in the browser.
-
- Ng-Template: Wraps content that is not visible by default but becomes visible when specific conditions are met.
-
- Host & Host-Context: CSS directives used to modify the styles of related components.
3. Why Angular?
Advantage of Angular
1) Efficient and high-quality code by Component-Based Architecture
Angular’s component-based architecture significantly enhances developer efficiency and ensures high-quality code. Components are reusable building blocks, self-contained units that encapsulate their functionality such as logic, template, and style, promoting code reusability and modularity. This creates a well-defined hierarchy of components and streamlines the development process.
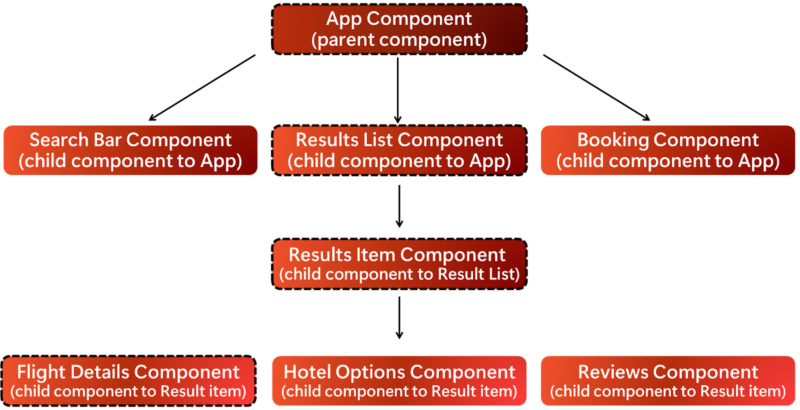
Example: Consider a travel booking application. The main application serves as a parent component hosting a search bar, results list, and booking summary. The results list has its child components, where each result item can host components for flight details, hotel options, and customer reviews. This structure allows developers to efficiently manage and maintain complex UIs.
Parent Component (ResultsItemComponent):
@Component({
  selector: 'app-results-item',
  template: `
    <app-flight-details [flight]="selectedFlight"></app-flight-details>
  `,
  styles: [`
    .flight { border: 1px solid #ccc; padding: 10px; }
  `]
})
export class ResultsItemComponent {
  selectedFlight = {
    name: 'Flight 123',
    departure: 'New York',
    arrival: 'London'
  };
}
Child Component (FlightDetailsComponent):
@Component({
  selector: 'app-results-item',
  template: `
    <div class="flight">
      <h3>{{ flight.name }}</h3>
      <p>{{ flight.departure }} - {{ flight.arrival }}</p>
    </div>
  `,
  styles: [`
    .flight { border: 1px solid #ccc; padding: 10px; }
  `]
})
export class FlightDetailsComponent{
  @Input() flight: any;
}
The benefits include:
-
- Reusability: Encapsulated components can be reused across different parts of an application, enhancing efficiency in large projects with numerous similar elements. This is particularly useful in enterprise environments where maintaining a consistent user experience across multiple applications is crucial. For example, a payment processing component developed for an eCommerce site can be reused in a mobile banking application.
-
- Readability: Encapsulation ensures that new developers can easily understand and work with the code, accelerating their productivity. In large teams, this reduces onboarding time and improves collaboration. For instance, clear and self-contained components allow developers to quickly understand functionality and make necessary changes without affecting the entire application.
-
- Testability: The independent nature of components simplifies unit testing and quality assurance processes. Each component can be tested on its own, ensuring that it works correctly before integration. This modular testing approach enhances the reliability of the application and makes it easier to find and fix bugs.
-
- Maintainability: Decoupled components can be easily replaced with improved implementations, simplifying updates and maintenance. This flexibility is vital for long-term projects where requirements may change over time. For example, upgrading a legacy component with a new version without disrupting the entire application becomes straightforward.
2) Enhanced Performance with Built-in Tools
Angular applications benefit from several built-in tools and techniques that enhance performance. These include hierarchical dependency injection, Angular Universal, the Ivy renderer, and differential loading.
Hierarchical Dependency Injection:
Angular’s hierarchical dependency injection decouples components from their dependencies by managing them in parallel. This technique builds a separate tree of dependency injectors that can be modified without reconfiguring the components, resulting in better performance and maintainability. This approach is particularly beneficial in complex applications where dependencies can be numerous and intricate.
@Injectable({
  providedIn: 'root'
})
export class LoggingService {
  log(message: string) {
    console.log(`Logging message: ${message}`);
  }
}

@Component({
  selector: 'app-user',
  template: `
    <div *ngIf="isLoggedIn">
      Welcome back, user!
    </div>
  `
})
export class UserComponent {
  constructor(private loggingService: LoggingService) {
    this.loggingService.log('User component initialized.');
  }

  isLoggedIn = true;
}
Hierarchical DI improves application scalability and performance. For instance, in a large enterprise application with multiple modules, each module can have its own dependency injector, ensuring that dependencies are resolved efficiently without affecting other modules.
Angular Universal:
This service allows server-side rendering of application views, which can improve load times and performance, particularly for users with slower internet connections. It supports frameworks like Node.js and ASP.NET Core. Server-side rendering improves SEO and the initial load time, making the application more accessible and user-friendly.
For example, a news website using Angular Universal can render the initial page content on the server, providing a faster and more responsive user experience.
Ivy Renderer:
Ivy is Angular’s latest renderer, introduced in Angular 9. It translates components and templates into JavaScript and HTML that browsers can understand, optimizing the application through features like tree-shaking, which removes unused code. This reduces the overall bundle size and improves load times.
@Component({
  selector: 'app-dynamic-content',
  template: `
    <div [ngClass]="{'active': isActive}">
      Dynamic Content
    </div>
  `,
  styles: [`
    .active { color: green; }
  `]
})
export class DynamicContentComponent {
  isActive = true;
}
Ivy’s ahead-of-time (AOT) compilation and tree-shaking capabilities make it ideal for large-scale applications. It ensures that only the necessary code is included in the final bundle, reducing load times and improving performance.
Differential Loading:
This technique creates different bundles for modern and legacy browsers, optimizing loading times and bundle sizes. It enhances performance by allowing modern browsers to use the latest syntax and polyfills, while legacy browsers receive a compatible bundle.
Differential loading ensures that users get the best possible experience regardless of their browser. For instance, a business application accessed by users with varying browser versions can benefit from optimized bundle sizes and faster load times.
3) Efficient Asynchronous Programming with RxJS
RxJS, a library often used with Angular, efficiently handles asynchronous data calls. It enables the handling of events independently and in parallel, preventing the web page from becoming unresponsive. RxJS simplifies asynchronous programming by using Observables, which describe how data streams interact and how the application reacts to changes within these streams.
Example: In a stock trading application, real-time stock prices can be managed with RxJS. Using Observables, stock prices can be streamed and updated in real-time without blocking the main thread.
import { Component, OnInit } from '@angular/core';
import { Observable, interval } from 'rxjs';
import { map } from 'rxjs/operators';

@Component({
  selector: 'app-stock-ticker',
  template: `
    <div *ngFor="let stock of stocks$ | async">
      {{ stock.name }}: {{ stock.price | currency }}
    </div>
  `
})
export class StockTickerComponent implements OnInit {
  stocks$: Observable<{ name: string, price: number }[]>;

  ngOnInit() {
    this.stocks$ = interval(1000).pipe(
      map(() => [
        { name: 'AAPL', price: Math.random() * 1000 },
        { name: 'GOOGL', price: Math.random() * 2000 },
        { name: 'AMZN', price: Math.random() * 3000 }
      ])
    );
  }
}
RxJS allows for complex data handling scenarios to be managed efficiently. In enterprise applications, this can be particularly useful for real-time data updates, user interactions, and background processing tasks. For example, an online collaboration tool can use RxJS to manage real-time updates and notifications, ensuring that users receive the latest information without delays.
Comparison with React
1) Performance
Both Angular and React are renowned for building high-performing web applications, but the question remains: which one is faster? One of the performance research suggests that Angular has a slight advantage in terms of app size, but React has an edge in terms of data binding performance. It says that newer versions of Angular are slightly faster than React and Redux, with a smaller app size of 129 KB compared to React + Redux’s 193 KB.
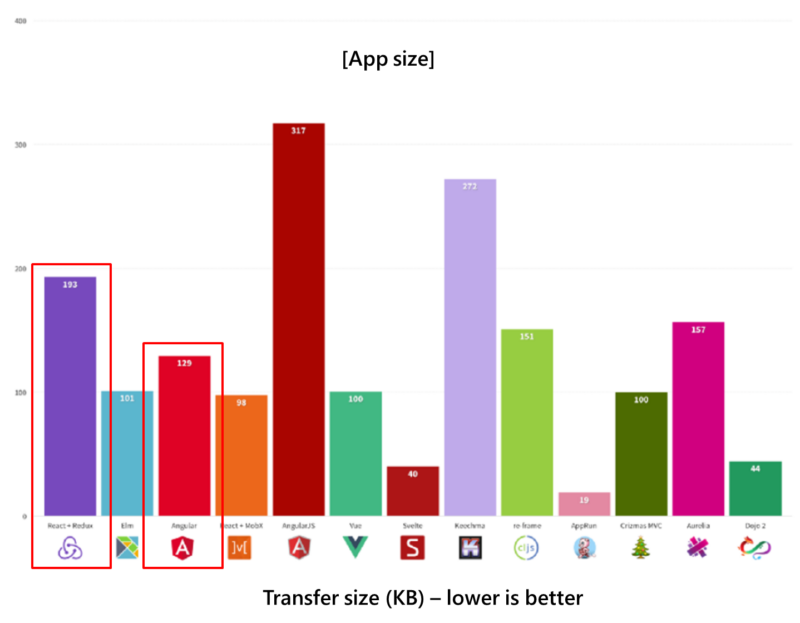
Angular’s performance optimization capabilities include efficient coding practices, digest cycle optimization, and $cacheFactory for memorization. Additionally, Angular’s real DOM rendering combined with its unique change detection mechanism and zones makes web apps faster. Older versions of Angular can also be used for projects that don’t require two-way data binding, reducing complexities.
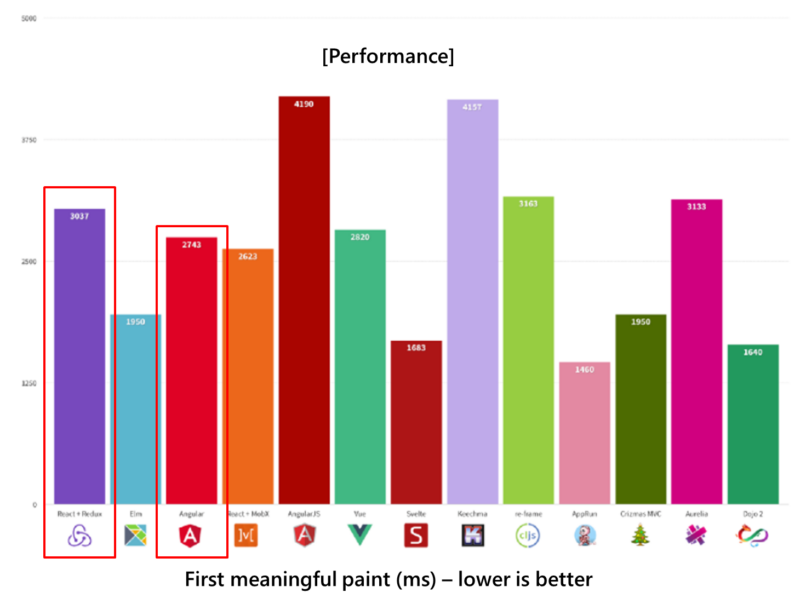
React, however, boasts a virtual DOM feature that enables swift performance by rendering updates faster and refreshing data quickly, particularly in complex and dynamic applications. Moreover, React’s data binding performance outshines Angular’s, making it a popular choice for applications that require frequent data updates. Furthermore, React’s component reusability promotes code quality and maintenance, leading to consistent app performance.
As the comparison unfolds, it’s clear that both frameworks have unique strengths. Angular’s advantages in app size and performance optimization capabilities are noteworthy, while React’s data binding performance and virtual DOM feature make it an attractive choice for developers. Ultimately, the choice between Angular and React depends on the specific needs and goals of each project.
2) Data binding
Angular and React differ fundamentally in their state management architectures. Angular’s built-in data binding capabilities enable bidirectional data flow, synchronizing model state and interface elements in real-time. This automatic coordination facilitates the development of complex, interactive user interfaces without requiring extensive callback chains or additional effort.
In contrast, React’s one-way data binding approach necessitates manual management of data flow, relying on external libraries like Redux or MobX to implement unidirectional data flow. This approach grants developers fine-grained control over data manipulation but requires more hands-on effort to manage complexity.
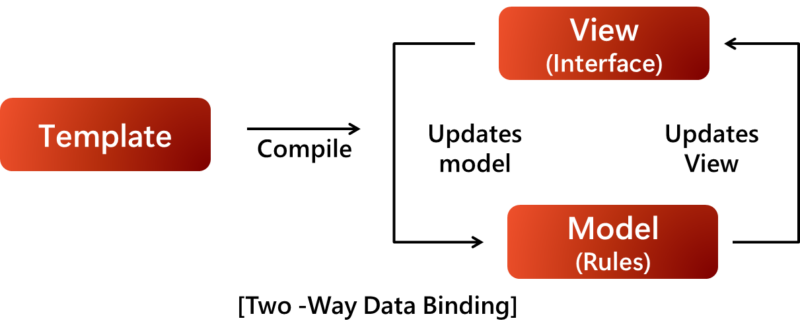
Angular’s two-way data binding leverages the TypeScript type system and dependency injection framework to ensure seamless coordination between components and services. This integration enables efficient data sharing and reduces the need for explicit data binding code. This technique is the most efficient technique for fetching data from large ERP (Enterprise Resource Planning) based software like medical software, or accounting. Thus it is more easy to build ERP software.
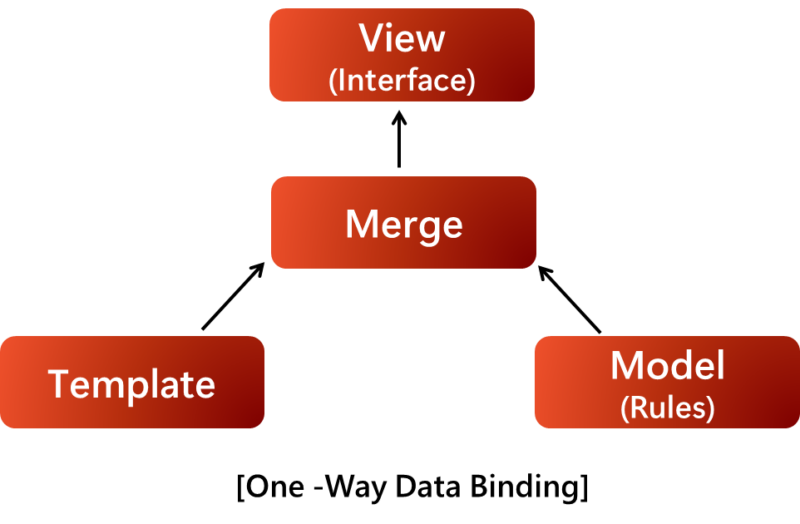
React, on the other hand, relies on virtual DOM manipulation and explicit state updates to manage data flow. While this approach offers precise control over data rendering, it requires more manual effort to optimize performance and manage complexity in large-scale applications.
3) Testing
Angular’s testing framework is designed with testability in mind, acknowledging the challenges of achieving comprehensive testing in dynamically typed languages like JavaScript. To address this, Angular incorporates various features that facilitate robust testing, including:
-
- Isolation of unit code
-
- Dependency injection for easy component decoupling and mocking
Angular’s built-in testing tools enable comprehensive testing and debugging of entire applications with a single tool, streamlining the testing process.
React, on the other hand, requires a suite of tools for different testing types. However, React’s testing approach offers advantages like:
-
- Mocking of non-existent parts in the testing environment
-
- Predictable tests through data or function mocking
-
- Continuous test execution as part of the development process
React’s test runners, such as Mocha, Ava, and Jest, enable concurrent testing while developing, ensuring timely feedback on test cases.
When to choose which?
Angular is a popular choice for building rapid data-driven web applications. With its component-based architecture and massive community support, Angular is a reliable and stable solution for large and complex applications. Ideal use cases for Angular include:
-
- Building and scaling complex applications with ease
-
- Creating custom elements and feature-rich applications
-
- Developing enterprise-scale projects without relying on third-party integrations
React, on the other hand, is a preferred choice for handling the view layer and building reusable UI components. Its ability to update data without reloading the page makes it a popular choice for large-scale applications. Ideal use cases for React include:
-
- Building personalized app solutions
-
- Creating applications with multiple events or sharable elements
-
- Developing cross-platform mobile apps
Both Angular and React have been used to build significant applications for major companies worldwide.
4. How to develop an Angular application?
Angular transformed web development by offering an efficient method to create dynamic single-page applications (SPAs). Creating complex dynamic web pages with basic JavaScript is time-consuming and difficult to manage in large projects. AngularJS makes this easier through SPA development and provides several key advantages. Now, let’s explore the Angular workflow.
1) Project setup
This stage involves creating and setting up a new project using Angular CLI. It includes generating the basic folder structure and files, and initializing the project with necessary configurations.
Before starting, node.js should be installed. Angular relies on Node.js and npm to handle dependencies and manage the development environment.
1) Install Node.js
Confirm that Node.js is installed on the laptop by running:
node --versionIf Node.js is not installed, download it from https://nodejs.org/en and follow the installation instructions.
2) Install Angular Command Line Interface (CLI)
To install the Angular Command Line Interface globally on the system, run the following command in the terminal:
npm install -g @angular/cli3) Create a New Angular Project
Generate a new Angular project by executing:
ng new ProjectNameSeveral questions will prompt the user to configure the new project. This command will create a new directory with the specified project name.
4) Navigate to the Project Directory and open it in Visual Studio Code
cd ProjectName
code .
Several questions will prompt the user to configure the new project. This command will create a new directory with the specified project name.
Setting Up Angular Material
-
- Open the terminal via the menu or command line:
‘View > Terminal’
- Open the terminal via the menu or command line:
-
- Install the Angular Material package by running:
npm install --save @angular/materialDuring the installation, several questions will prompt the user to customize the setup based on the project’s needs.
2) Modules and Components
This involves creating a modular structure and generating components responsible for various functionalities. Modules logically separate the application, while components are the building blocks of the user interface.
Modules
Module is an essential configuration file in Angular and everything begins with the module. This groups together components, directives, services, and other modules.

As the diagram says, it starts from ‘app.module’ and this includes ‘app.component’ which is the main class in Angular project. The module itself is an Angular class with NgModules decorator containing essential metadata.
@NgModule({
  declarations: [ // components created within the module
    AppComponent
  ],
  imports: [ // imports from other files that will be used in components
    CommonModule,
    OtherModule
  ],
  providers: [ // services and interceptors used within the components
    TodosService
  ],
  exports: [ // allowes parts to be used in other modules
    AppComponent
  ]
})
export class AppModule { } // name of the module
Modules also configure crucial dependencies for our project, such as:
-
- HttpClientModule for HTTP communication
-
- BrowserModule & ServerModule for web or server-side applications
-
- CommonModule which includes Angular’s built-in directives and pipes
-
- RoutingModule for application routing
Modules are often divided into groups known as features. Feature modules encapsulate all parts related to a specific feature of the application. Components can also have their own modules.
To generate a component within a particular module, use the –module flag:
ng generate component Hello --module MyCustomModuleComponents
Angular components are the fundamental building blocks of Angular applications, encapsulating the UI and business logic. Each component typically includes four essential files:
-
- Template (HTML) : Defines the component’s HTML structure.
-
- Styles (CSS/SCSS) : Provides the styling for the component.
-
- Component (TypeScript) : Contains the logic and data.
-
- Spec (TypeScript Test file) : Includes tests for the component.
A component is defined using the @Component decorator, which specifies metadata such as the selector, template URL, and style URLs:
import { Component, OnInit } from '@angular/core';

@Component({
  selector: 'app-todos',
  templateUrl: './todos.component.html',
  styleUrls: ['./todos.component.scss']
})
export class TodosComponent implements OnInit {
  constructor() { }

  ngOnInit() {
    console.log('Hello World!');
  }
}
Alternatively, the template and styles can be inlined directly within the component:
@Component({
  selector: 'app-todos',
  template: '.<div class="title">Component content</div>',
  styles: ['.title { color: red; }']
})
3) Services
Writing services for data management and providing them where needed through dependency injection. Services handle the business logic and data, allowing for independent hosting and easy sharing across components.
Services in Angular are TypeScript classes annotated with the @Injectable decorator. These services are designed to manage business logic and are commonly used to connect components to APIs and facilitate data sharing between components.
To utilize HTTP Services in Angular, the HttpClientModule must be imported into the providers array of a component or root module.
Example of a Service in Angular
@Injectable({
  providedIn: 'root'
})
export class TodosService {

  constructor(private readonly httpClient: HttpClient) {}

   getAllTodos(): Observable<ITodo[]> {
     return this.httpClient.get<ITodo[]>('localhost:3000/api/todos');
   }

   createTodo(todoData: ITodo): Observable<ITodo> {
     const headers = new HttpHeaders()
     headers.set('content-type', 'application/json')
     return this.httpClient.post<ITodo>('/api/...', todoData, { headers });
   }
}
The service is then injected into a component via its constructor, allowing the component to utilize the service’s methods.
constructor(private readonly todosService: TodosService) {}

ngOnInit(): void {
  this.todosService
    .getAllTodos()
    .subscribe((data: ITodo[]) => console.log(data));
}
4) Routing
Angular’s routing system is an integral feature for creating single-page applications. It facilitates navigation and routing within the application, allowing users to move between different views and components seamlessly.
Overview of Angular Routing
Angular Router, part of the @angular/router package, allows defining routes and navigating between different components. The routing configuration begins with the AppRoutingModule, which is included in the main AppModule.
import { NgModule } from '@angular/core';
import { BrowserModule } from '@angular/platform-browser';
import { AppRoutingModule } from './app-routing.module';
import { HttpClientModule } from '@angular/common/http';

@NgModule({
  declarations: [AppComponent],
  imports: [
    BrowserModule,
    AppRoutingModule,  // This is where the routing configuration is set.
    HttpClientModule
  ],
  providers: [],
  bootstrap: [AppComponent]
})
export class AppModule {}
Routes are defined in an array and mapped to components. Here’s an example:
constructor(private readonly todosService: TodosService) {}

ngOnInit(): void {
  this.todosService
    .getAllTodos()
    .subscribe((data: ITodo[]) => console.log(data));
}
Types of Routing options
Angular supports various types of routing configurations:
-
- Static routes: Direct mapping to components.
-
- Dynamic parameter routes: Routes with parameters, such as /:id.
-
- Child routes: Nested routing within feature modules.
-
- Auxiliary routes: Multiple routes in a single URL.
-
- Redirects: Redirect from one route to another.
-
- Wildcard routes: Catch-all routes, typically used for 404 pages.
-
- Guards: Control access to routes.
-
- Resolvers: Pre-fetch data before activating a route.
-
- Lazy-loaded Routes: Load feature modules on demand.
After setting up the routes, they are incorporated into the router configuration of the RoutingModule.
@NgModule({
  imports: [RouterModule.forRoot(routes)], // routes array
  exports: [RouterModule]
})
export class AppRoutingModule {} // module included in the AppModule
Each component module can have its own set of routes, allowing for the definition of multiple routing modules.
const routes: Routes = [
  {
    path: '',
    component: UnitTestingPageComponent
  }
];

@NgModule({
  imports: [RouterModule.forChild(routes)],
  exports: [RouterModule]
})
export class UnitTestingRoutingModule {}
Notice that RouterModule.forChild(routes) is used instead of RouterModule.forRoot(routes) as seen in the AppRoutingModule.
RouterModule.forRoot is utilized to configure the router at the root level of the application, and only one root router is permitted. In contrast, RouterModule.forChild is employed to configure additional child routes within a feature module or component, and multiple child routing modules are allowed.
Router Configuration and Navigation
The RouterOutlet directive is a placeholder in the template where the router inserts components:
<router-outlet></router-outlet>For navigation, the RouterLink directive binds links to routes:
<a [routerLink]="['/profile']">Profile</a>
<a [routerLink]="routerLinkVariable">Dynamic Profile</a>
Router links can also include query parameters and state information:
<a
  [routerLink]="['/user/bob']"
  [queryParams]="{debug: true}"
  [state]="{tracingId: 123}">
  User Profile
</a>
Programmatic navigation within components is possible using the Router service:
import { Router } from '@angular/router';

export class AppComponent implements OnInit {
  constructor(private readonly router: Router) {}

  onButtonClick() {
    this.router.navigate(['/profile']);
  }
}
Advanced Features
Advanced routing features include lazy loading for optimizing performance by loading feature modules only when needed. Additionally, route guards (CanActivate, CanDeactivate) ensure that users have the necessary permissions to access specific routes, and route resolvers can pre-fetch data required for a component before it is activated
5) Pipes
Pipes are functions used in a template that in data as an input and transform it into an output. Angular’s built-in pipes offer a robust way to transform data within templates, providing an extensive range of functionalities for formatting text, JSON, dates, numbers, percentages, currency, and array slicing. By leveraging these pipes, developers can effectively manipulate data to meet specific requirements. The Angular Doc API Reference (https://v17.angular.io/api#!?query=pipe) serves as a comprehensive resource, detailing each built-in pipe and their respective parameters. By exploring the official github code (https://github.com/angular/angular/tree/09d9f5fe54e7108c47de61393e10712f8239d824/packages/common/src/pipes), developers can gain a deeper understanding of how these pipes are implemented and optimize their usage to streamline data transformation in their Angular applications.

source : https://angular.dev/api/
DatePipe
The Angular DatePipe formats dates according to locale rules, allowing developers to customize temporal data display. Notably, this pipe stands out from other frameworks’ approaches, as it eliminates the need for additional JavaScript packages. Developers can leverage the ‘DatePipe’ by simply appending the pipe symbol (|) along with the desired date and optional parameters. This streamlines the process and facilitates seamless integration within Angular applications.
<p>Today’s date is {{ currentDate | date }}</p>The code above uses the ‘currentDate’ variable and the ‘DatePipe’ to format the date according to locale rules. The date settings are configured in the component’s TypeScript file. Additional arguments can be passed to the ‘DatePipe’ to further customize the output.
<p>Today’s date is {{ currentDate | date:’shortDate’ }}</p>This example uses the ‘shortDate’ option to format the date. Other options, such as ‘z’, ‘longDate’, and custom formats like ‘dd/MM/YY’, are also available.
UpperCasePipe & LowerCasePipe
Angular’s UpperCasePipe and LowerCasePipe offer a convenient way to transform text to uppercase or lowercase, respectively, enabling seamless text manipulation. To convert text to all uppercase, simply utilize the UpperCasePipe, while the LowerCasePipe facilitates conversion to lowercase. The way of using these pipes is straightforward, requiring only the addition of the pipe symbol (|) alongside the respective pipe function. There are simple examples :
<p>{{ text | uppercase }}</p>
<p>{{ text | lowercase }}</p>
JsonPipe
The Angular JsonPipe is designed to transform information into a structured, JSON-string representation, serving as a versatile conduit for data manipulation leveraging JavaScript’s inherent capabilities. This multipurpose tool is particularly useful during development for diagnostic applications, applicable to various data structures, including objects and arrays.
To use the JsonPipe, developers must employ a specific syntax, specifying parameters and values to effectively process JSON data. The steps required may vary depending on the desired outcome or the intended use of the processed information.
{ expression | json }}The term “expression” refers to the information that needs to be converted into a JSON object. To illustrate this concept, consider a scenario with a JavaScript class called “Person” that represents an individual with various attributes such as name, age, and address. Additionally, an array of Person instances can be created, allowing for easier manipulation and organization of data related to different individuals within an application.
import { Component } from "@angular/core";

@Component({
    selector: "app-root",
    templateUrl: "./app.component.html",
    styleUrls: ["./app.component.scss"],
})
export class AppComponent {
    user: Person = new Person("John", "Doe", 30, "123 Main St");

    profiles: Person[] = [
        new Person("John", "Doe", 30, "123 Main St"),
        new Person("Peter", "Parker", 22, "456 Oak Ave"),
    ];
}
class Person {
    firstname: string;
    lastname: string;
    age: number;
    address: string;

    constructor(firstname: string, lastname: string, age: number, address: string) {
        this.firstname = firstname;
        this.lastname = lastname;
        this.age = age;
        this.address = address;
    }
}
The provided code example demonstrates how to create a ‘user’ object and an associated ‘profiles’ array. To further process this information in JSON format, the ‘JsonPipe’ is utilized for conversion purposes.
<p>{{ user | json }}</p>
<p>{{ profiles | json }}</p
The ‘JsonPipe’ converts the user object and profiles array into a JSON representation, making it convenient to inspect within the context of template development or debugging sessions.
AsyncPipe
Angular’s AsyncPipe provides an efficient way to handle asynchronous data streams, seamlessly integrating with observables and promises. This built-in pipe enables automatic subscription and unsubscription, ensuring smooth synchronization between data binding and user interface updates. By leveraging the AsyncPipe, developers can access the most recent output from these data sources in real-time, facilitating efficient data rendering.
To utilize the AsyncPipe effectively, developers must adhere to a structured approach, specifying asynchronous functions within component templates and utilizing the “async” keyword to define the desired behavior. The pipe itself can be accessed via the “|” symbol, ensuring efficient and flexible data flow between components.
The AsyncPipe’s practical application is demonstrated in the following code snippet:
{{ expression | async }}Here, “expression” represents the observable or promise being subscribed to.
let numbers = of(1, 2, 3, 4, 5);By leveraging the AsyncPipe, developers can subscribe to this observable and display the most recently released value in a template-based component, as shown below:
<p>{{ numbers | async }}</p>This code shows the effective use of Angular’s ‘AsyncPipe’, showcasing its ability to manage asynchronous operations within template-based components. Upon initialization, the pipe automatically subscribes to the connected ‘Observable’ or Promise, canceling the subscription when the component is destroyed. This provides an efficient way to render the latest value emitted by the ‘Observable’, without adding unnecessary overhead during runtime.
6) Reactive Programming
Angular has fully embraced reactive programming as a vital component of modern web development. Reactive programming fundamentals revolve around reacting to data changes, setting up streams of data, and enabling applications to react automatically when data changes. Angular provides various tools and concepts for building reactive applications, including Observables, Subjects, BehaviorSubjects, ReplaySubjects, and Signals.
Observables, a central piece of Angular’s reactive programming toolkit, represent data streams that can emit multiple values over time. They can handle various asynchronous operations, such as HTTP requests, user input, and timers, leveraging RxJS (Reactive Extensions for JavaScript) for implementation.
Subjects, a particular type of Observable, are both observers and observables, producing and consuming values. They are a powerful tool for building event-driven architectures within applications. Two commonly used types of Subjects in Angular are BehaviorSubjects and ReplaySubjects. BehaviorSubjects have an initial value, emitting the most recent value to new subscribers, while ReplaySubjects store and replay a specified number of previous values to new subscribers.
Signals, although not native to Angular, are a concept associated with reactive programming. They combine a value with a change notification, emitting a signal to notify subscribers when the value changes. In Angular, Signals can be created using various techniques, including Subjects and custom implementations, and are often used for tracking changes in local component state, sharing state across components, and updating templates when data changes.
These concepts are essential in various application scenarios. Observables manage asynchronous operations, handle user input, and monitor changes in data from various sources. Subjects create custom events, share state between components, and manage global application state. BehaviorSubjects manage and share stateful data with an initial value, while ReplaySubjects replay historical data or event logs to new subscribers. Signals track local component state, share custom change notifications, and update templates when data changes.
7) State Management
State management is crucial for building scalable applications, enabling effective handling of user control states. This process is essential for developing large-scale applications with complex data communications, ensuring high performance and efficiency. In Angular, NgRx and NGXS are the premier libraries for state management, offering distinct features that simplify development.
7-1) What is NgRx?
NgRx is inspired by Redux and helps developers simplify the application’s state in objects by enforcing a unidirectional data flow.
7-2) How does NgRx work?
NgRx is inspired by Redux and helps developers simplify the application’s state in objects by enforcing a unidirectional data flow.
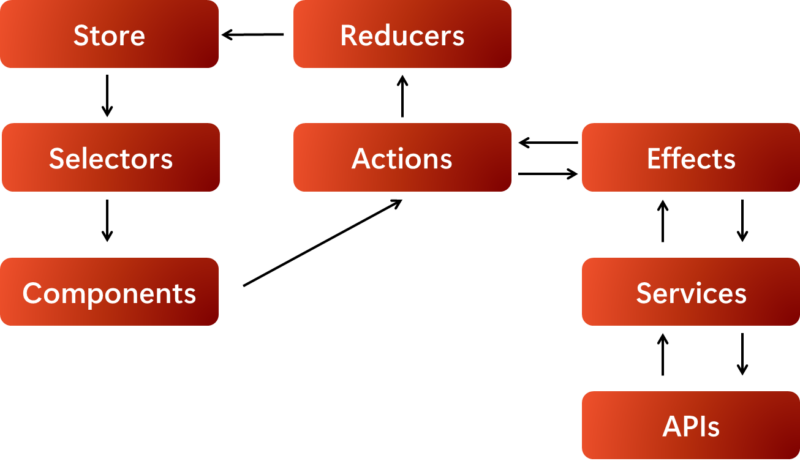
The NgRx state management architecture comprises five essential components:
-
- Store: This immutable repository maintains the application’s state.
-
- Selectors: Angular components subscribe to the store and receive updates via selectors.
-
- Reducers: Responsible for managing state transitions, reducers handle actions and update the store accordingly.
-
- Actions: These modify the store’s state by triggering reducers.
-
- Effects: Consequences of actions, effects can also listen for specific action types and execute when triggered.
While this process may appear intricate, its benefits become apparent when managing data communication in large-scale applications. By leveraging NgRx, developers can efficiently handle complex state management, ensuring scalability and performance.
8) Testing
Angular’s built-in emphasis on testability ensures robust applications. Angular tests are categorized into three main types: unit tests, end-to-end tests, and integration tests. Unit tests verify isolated units of code, while end-to-end tests simulate user interactions, testing the application from UI to database. Integration tests, a subtype of unit tests, use similar tools to exercise functions and compare results. The testing pyramid concept helps distinguish these testing approaches.
8-1) The Testing Pyramid

The testing pyramid comes up pretty often. This is a handy visual that represents the ideal proportions of unit, integration, and end-to-end tests in an application.
At the base of the pyramid are unit tests, which form the bulk of testing efforts. These tests focus on individual units of work, such as classes or functions, to ensure they perform as expected.
Integration tests occupy the middle layer of the pyramid, covering interactions between multiple units of code. These tests may encompass a few components or the entire frontend of the application. While fewer in number than unit tests, integration tests play a vital role in verifying the seamless interaction of code components.
End-to-end (E2E) tests sit at the pinnacle of the pyramid, simulating real-world scenarios by testing the entire application with actual dependencies. This approach ensures that the application functions as intended, without the need for mockups or fake dependencies.
8-2) How to start Angular Testing
In Angular, the app.component comes with its own test file, app.component.spec.ts. The app also comes ready to go with an E2E testing folder.
-
- Unit Tests
Angular’s unit testing framework, powered by Jasmine and Karma, provides a solid foundation for application reliability. The Angular CLI automatically generates spec files and unit tests for new components and services, simplifying the process. However, mastering unit testing requires expertise and experience.
- Unit Tests
it(‘should create’, () => {
    expect(component).toBetruthy();
});
it('#getValue should return value from dataService', () => {
// create `getValue` spy on an object representing the DataService
const dataServiceSpy =
jasmine.createSpyObj('DataService', ['getValue']);
// set the value to return when the `getValue` spy is called.
const stubValue = 'stub value';
dataServiceSpy.getValue.and.returnValue(stubValue);
weatherService = new WeatherService(dataServiceSpy);
expect(weatherService.getValue())
.toBe(stubValue, 'service returned stub value');
expect(dataServiceSpy.getValue.calls.count())
.toBe(1, 'spy method was called once');
});Spies are useful in Angular testing for mocking real services, which speeds up tests and avoids reliance on external services. Spies return custom responses, preventing real HTTP requests and potential brittleness. Additionally, spies track method calls, allowing tests to verify that dependencies are used correctly, as shown by confirming the getValue method is called exactly once in the example.
By adhering to these testing strategies, developers can ensure Angular applications are reliable and maintainable. Embracing unit, integration, and end-to-end testing enhances code quality and builds confidence in the application’s performance. A well-tested application is a key component of successful software development (https://www.mantrax.io/custom-software-development/).


