
Creating applications can take two routes; Android and iOS. Each platform presents its challenges and requirements. This article specifically looks at iOS development highlighting the blend of skills decision making and meticulous attention to detail required for success.
Why Choose Native iOS Apps
iOS vs Android
Choosing the right platform is essential for an app’s success. While the global mobile market is dominated by two main platforms, Apple’s iOS and Google’s Android, the adoption of each varies significantly by country.
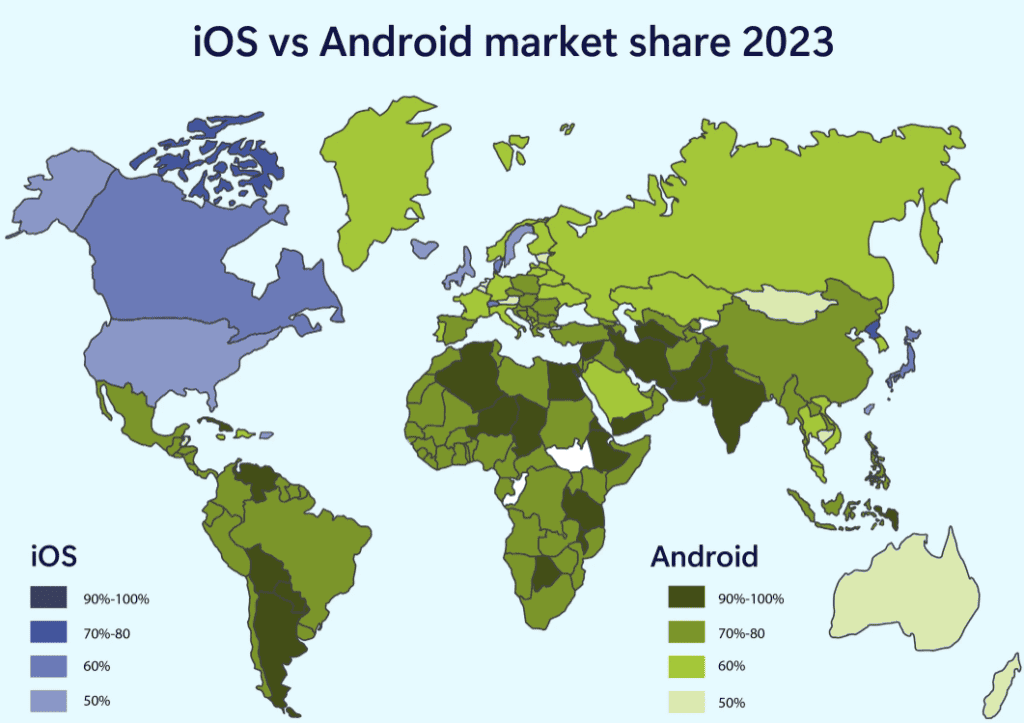
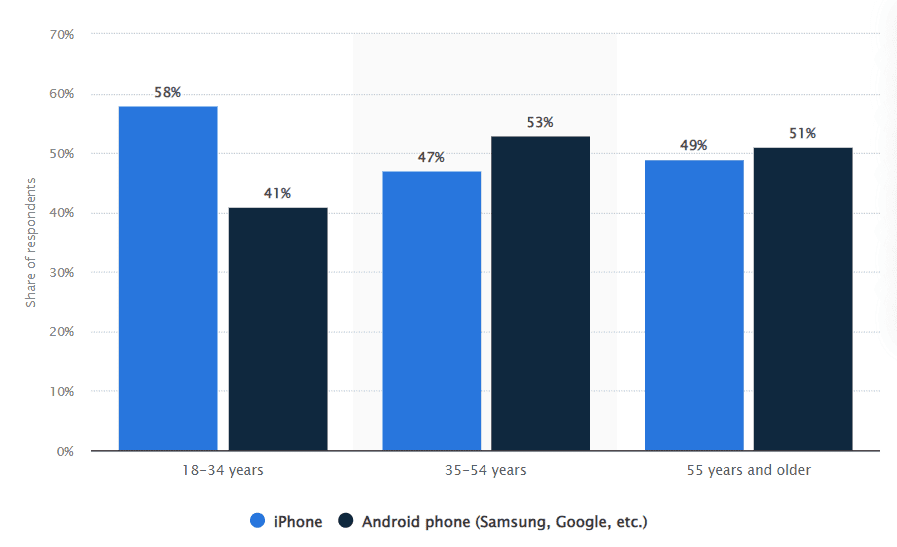
Based on the market share, targeting the US audience with an app suggests that the iOS platform is the optimal choice. Conversely, if the product is primarily aimed at markets outside of US and Canada, then opting for Android is advisable. Additionally, below research indicates that in the US, younger mobile users (aged 18-34) show a preference for iOS devices.
Business Cases Where iOS Outperforms Hybrid, PWA, and Android Solutions
For some business applications, iOS apps are frequently considered the optimal choice, due to their emphasis on performance, security, user experience and seamless integration, with Apples ecosystem despite the benefits of hybrid apps, PWAs and Android apps.
When it comes to brand image aligning with Apples brand can significantly elevate the perceived quality of products or services offered. This association holds importance in enterprise settings.
For technologies and startups targeting adopters who lean towards iOS devices leveraging cutting edge features and hardware capabilities is key to staying ahead in the market.
The follows are examples of business applications, where iOS excels:
Finance and Banking: Enterprises often favor iOS due to its security features and enhanced control over distribution and management. Additionally the seamless integration within Apples ecosystem boosts productivity levels for enterprise solutions.
- Security: iOS is recognized for its security features making it a favored choice for institutions prioritizing the safeguarding of sensitive user information.
- Performance: Native iOS apps can efficiently handle transactions and real time data updates.
Healthcare: In the realm of fitness and health tracking, superior integration, with Apple Watch and other health tracking devices is essential. Utilizing HealthKit for data integration enhances the user experience in this domain.
- Compliance; The stringent security standards of aid in adhering to healthcare regulations like HIPAA.
- Device Integration; Enhanced compatibility with health related hardware and software such as Apple HealthKit and ResearchKit.
E commerce and Retail: There is a focus on high end consumer apps that cater to premium markets like luxury goods and high end services. The refined user experience provided by iOS apps plays a role in this sector.
- User Experience: Exceptional user experience can lead to increased user engagement and conversion rates.
- Payment Systems: Smooth integration with Apple Pay enhances the payment process.
Media and Entertainment: In the travel and hospitality industry prioritizing an user experience can significantly impact customer satisfaction and loyalty levels. Leveraging geolocation services efficiently can further enhance service delivery in this sector.
- Performance: Native iOS apps meet the high performance demands for streaming services and gaming effectively.
- Monetization: iOS users tend to spend more on applications and in app purchases resulting in return on investment (ROI).
Education:
- Interactive Learning: rich educational apps, with performance can be developed more effectively as native iOS applications.
- Device Integration: Enhancing the connection, with Apples tools and devices such as iPads and Apple Classroom is crucial for seamless device integration.
Development Options
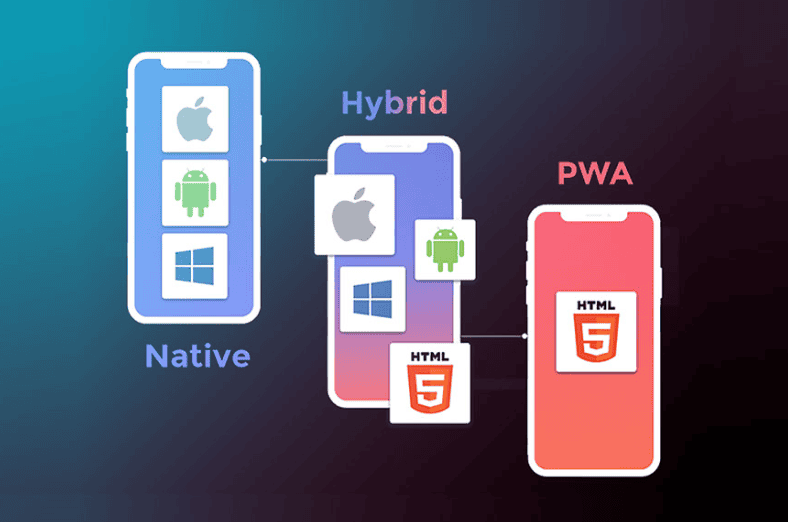
Even after deciding to develop an iOS app not Android, one must still determine the approach to take. There are three main development approaches: Native, Hybrid, and Progressive Web Apps (PWA).
Native Apps
A native app is a software application designed specifically for a single platform, such as iOS or Android. For Android development, native apps can be created using Kotlin or Java, while for iOS, Swift or Objective-C is used. Native apps are known for their high performance and access to a wide range of APIs, providing a fast and responsive user experience. However, they require separate development efforts for each platform, leading to higher costs and longer development times.
- Advantages:
- Provides the fastest, most reliable, and responsive environment for users.
- Easy access to various native features such as the camera, microphone, GPS, and swipe gestures.
- Disadvantages:
- Requires separate codebases for different platforms, leading to more time and cost.
- Longer development and build times.
- When to use:
- For developing 3D games or animations.
- When needing to utilize specific device features.
- For complex apps requiring high performance and precise functionality.
Hybrid Apps
Hybrid apps combine elements of native apps and web apps. Using well-known web technologies like JavaScript, HTML, and CSS, hybrid apps can be developed to run across multiple platforms. They offer cost and time efficiency, easier maintenance, and access to basic API functionalities. However, they may face performance issues and lack offline functionality. Additionally, utilizing specific device features can be challenging due to the shared codebase.
- Advantages:
- Single codebase: One app can be built and slightly adjusted to run on both platforms, saving time and money.
- Generally cheaper to develop compared to native apps.
- Easy to scale and access native features.
- Disadvantages:
- Performance issues are a significant drawback.
- Cross-platform development and user experience challenges: Ensuring that the hybrid app performs well on both native platforms often requires substantial effort, which can sometimes equal the total cost of developing native apps.
- When to use:
- When a broad user base across multiple platforms (mobile and web) is needed.
- For simple projects based on content, with no need for complex functionalities or animations.
- When a tight timeline requires a quick development for multiple devices.
- When the project idea needs to be tested with minimal investment.
Progressive Web Apps (PWA)
PWA is similar to hybrid apps but has some differences. They provide a native app-like experience while being accessible through a web browser without the need for downloads or installations. PWA can function offline, send notifications, and utilize hardware features like the camera and GPS, especially on Android. They offer an optimized user experience without needing specialized languages or frameworks.
- Advantages:
- Operates offline and on slow networks using service workers.
- Always up-to-date due to service worker updates.
- Secure, as they are served over HTTPS.
- Runs on various platforms, offering a responsive experience across different devices.
- More cost-effective and faster to develop than native apps.
- Easily accessible without installation steps, enhancing user convenience.
- Searchable via search engines.
- Disadvantages:
- Older browsers may not support PWAs.
- Limited performance on iOS and less support for Apple devices.
- Cannot be distributed through app stores, reducing marketing opportunities.
- Higher battery consumption.
- When to use:
- When needing a multi-platform app with native app functionalities.
- For providing consistent services to a large number of users accessing through various channels.
- For robust e-commerce services.
For additional details, check out this post on Choosing the Right App Development Approach: The Pros and Cons of Native, Hybrid, PWAs and Cross-Platform Apps.
iOS App Development Tools
Requirements
Developing iOS apps requires a combination of tools, software, and hardware. If a developer is new to iOS development, understanding these requirements is crucial for success. Here’s a breakdown of the essential requirements:
Mac Computer
A Mac computer is the first requirement for creating iOS applications. This is because Xcode, the integrated development environment (IDE) for iOS development, only runs on macOS. A developer will need a Mac with an Intel-based CPU running Mac OS X version 10.8 or later. The Mac Mini is a cost-effective option, with the entry-level model featuring an Intel Core i5 dual-core CPU and 4GB of RAM.
Apple Developer Account
It is mandatory to have an apple developer account to make an iOS application. This free account provides access to Xcode, iOs SDK documentation, and other technical tools. This account is different from the paid iOS Developer program, which is required for publishing apps on the App Store. A developer will need to sign up for an Apple ID and register.

Xcode Installation
Xcode is the only program available to create iPhone and iPad apps. A developer can download Xcode from the Mac App Store, which includes the iOS SDK, a source code editor, UI editor, debugging tools, and an iPhone simulator. Xcode is a comprehensive IDE that provides everything a developer needs to develop, test, and debug their apps.
The iPhone (or iPad) simulator included with Xcode is the most crucial feature, as it allows developers to test their app without using iOS devices. To access Xcode, they simply need to launch the Mac App Store on their computer and download.
Programming Languages
To begin this iOS mobile app, there are two programming languages available. Swift and Objective-C both have their own strengths and weaknesses, and Swift has emerged as the preferred choice for developers.
Objective-C, developed in the early 1980s, was the primary programming language for Apple for decades. Derived from the C language,Objective-C is an object-oriented programming language that revolves around passing messages to different processes, unlike traditional C programming. Even though Swift is now the preferred language, many developers still choose to update their older apps written in Objective-C instead of rewriting them in Swift.
On the other hand, Swift, released in 2014, has revolutionized iOS development. Designed to be easier to read and write, Swift offers a simpler syntax and enhanced security features compared to Objective-C. With its ability to share a runtime with Objective-C, developers can seamlessly incorporate legacy code into updated apps.Swift’s ease of use makes it an attractive option for new programmers, and its faster performance and security features make it a compelling choice for developers.
While Objective-C still has its place in iOS development, Swift has emerged as the go-to language for building iOS apps. Unless there’s a specific reason to stick with Objective-C, developers should consider using Swift for their iOS development needs.
iOS App Development Process
Research
Identifying the target audience
Knowing the target audience is crucial when deciding on the platform, whether it’s iOS or Android, and the development approach, either Native or Hybrid. If the decision is to go with iOS, understanding the audience becomes even more critical, The end users’ preferences and needs will significantly influence the app’s design, functionality, and overall success.
Analyzing the Competition
The presence of similar apps in the App Store should be seen positively, as it indicates a viable idea with a genuine need. Analyzing these existing apps helps reveal how well they fulfill user requirements. This analysis should cover:
- App Name: Noting it for identification and potential keyword insights.
- Feature Set: Listing core features, unique offerings, and missing functionalities.
- Price/Monetization: Understanding how competitors monetize their apps and the user reception.
- App Publisher: Identifying whether it is an individual or a company.
- Last Updated: Checking the maintenance frequency to gauge active competition.
- Ratings and Reviews: Analyzing user feedback to pinpoint strengths and weaknesses.
- Downloads: Using tools like SensorTower for download estimates to assess popularity.
Understanding the industry and audience
Leveraging an existing user base to analyze trends and identify user groups most likely to benefit from the app is vital. Tools such as Statista and Google Trends offer valuable industry and audience data. Competitor analysis using tools like App Annie and App Data can reveal user demographics and performance metrics. Survey services like SurveyMonkey or Survata can help gather potential audience feedback, while platforms like ProductHunt and LaunchSky allow pitching the idea to early adopters.
Evaluating costs and benefits
App development can be expensive. If the app is central to the business, evaluating the potential benefits is crucial to ensure it is worthwhile. Research indicates significant ROI (Return on Investment) from mobile solutions, with increased benefits in new revenue streams, cost savings, and access to mission-critical apps. Industry reports show that many organizations using KPIs to measure mobile success report positive ROI.
Establish a Coding Style
Adhering to consistent coding standards is essential for any development project. Establishing solid coding standards, or adopting existing ones such as GitHub’s Objective-C or Swift guides, or Google’s Objective-C guide, is essential for creating an application that is easy to maintain and update. By following a common programming approach, every member of the team, as well as outside developers, can easily read and understand the code, making it simpler to make required edits and contributions.
Utilizing established libraries and frameworks can significantly streamline the development process. UIKit and Interface Builder are fundamental tools in iOS development, providing the building blocks for creating intuitive user interfaces. Working with APIs is another crucial aspect, allowing the app to interact with external services and data sources seamlessly.
Libraries
Alamofire: A popular Swift-based HTTP networking library that simplifies tasks such as making network requests, handling responses, and managing API calls. By using Alamofire, developers can avoid writing repetitive boilerplate code for network operations.
Realm: A mobile database framework that provides a fast and easy way to manage data. Unlike Core Data, Realm is designed to be more intuitive and offers better performance for complex data operations. It is ideal for apps that require offline data storage and real-time synchronization.
Frameworks
UIKit: This framework provides the necessary infrastructure for constructing and managing iOS apps. It includes components such as buttons, labels, table views, and gesture recognizers. UIKit handles the app’s event-driven behavior and user interface layout, allowing developers to create visually appealing and responsive apps.
Designing User Interfaces with SwiftUI
Maintaining a mobile app is a necessary ongoing expense, typically amounting to 15-20% of the initial developmenSwiftUI is a modern framework for building user interfaces across all Apple platforms with the power of Swift. It provides a declarative syntax that allows developers to write less code while achieving more functionality.t cost per year. This covers several key areas including hosting, monitoring, user engagement, marketing, updates, and licensing.
- SwiftUI : A user interface toolkit that lets developers design apps by describing what the UI should look like and how it should behave. With SwiftUI, the interface code is concise and easy to read, and it integrates seamlessly with the rest of the Swift code. SwiftUI also provides live previews, allowing developers to see changes in real-time as they modify their code.
- Declarative syntax: SwiftUI uses declarative syntax, which means developers describe what the UI should do rather than how to do it. This leads to more readable and maintainable code.
- Cross-Platform Compatibility: SwiftUI works across all Apple platforms, including iOS, macOS, watchOS, and tvOS, allowing developers to create a consistent experience on multiple devices.
- Live Previews: The ability to see live previews of the UI as it is being built helps developers iterate quickly and catch issues early in the development process.
Development
Feature Implementation Planning
The initial phase in business app development was often referred to as business requirements gathering. This phase was essential for understanding and clarifying what the clients wanted. However, for personal app development, this phase can be adapted to focus more on planning feature implementation.
During this phase, developers and stakeholders collaborate to outline the specific features and functionalities that the app will provide. This involves detailed discussions and documentation of every aspect of the app’s capabilities, ensuring that the development team has a clear roadmap to follow.
While the documentation doesn’t need to be as exhaustive as in large-scale consulting projects, it is still important to identify the main features and goals of the app to avoid wasted effort later on. For instance, instead of just saying that users can create accounts, the plan should specify that users can sign up using email, Facebook, Twitter, or Google accounts, and manage their profile details such as username, profile photo, and bio. Here is an example of detailed feature planning for a social networking app might include:
- User Account Management
- Users can create an account using email and password.
- Users can log in using Facebook, Twitter, or Google accounts.
- Users can reset their password via email.
- Users can delete their account
- Profile Customization
- Users can set a username.
- Users can upload a profile photo from their photo library or take a new one using the in-app camera.
- Users can write and edit a short bio.
- Social Features
- Users can send friend requests and accept or decline incoming requests.
- Users can post status updates with text and images.
- Users can like, comment, and share posts from other users.
This approach ensures that every feature is thought out and documented, providing a solid foundation for development. It helps in setting clear expectations and reduces the likelihood of scope changes during the later stages of the project.
Optimal Architecture Design
Choosing the right architecture is foundational for building scalable and well-organized applications. For iOS development, the Model-View-Controller (MVC) pattern is highly recommended and advocated by Apple. This architecture divides the code into three main components.
- Model : Manages the data and business logic of the application. It holds the application data and is typically implemented as a struct or class. The model represents the core of the application’s functionality, handling the operations and data management
- View : Represents the user interface and is responsible for displaying the data provided by the model. It includes UI elements such as buttons, labels, and the other controls. Each app screen typically corresponds to a view, providing a visual representation of the data and enabling user interaction.
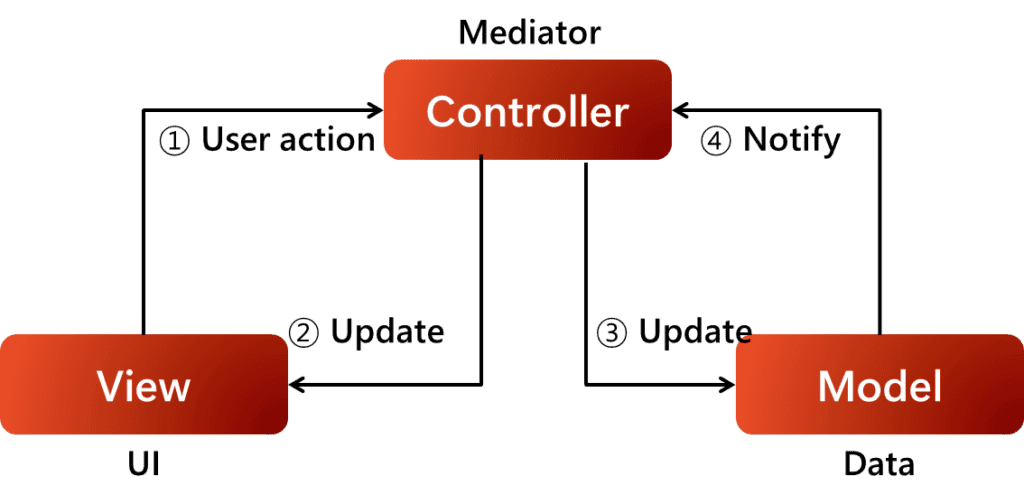
- Controller : Acts as an intermediary between the model and the view. It coordinates the interactions between them by receiving user input, processing it (often by updating the model), and updating the view accordingly. The controller ensures that the model’s data is presented on the view and can change the model based on user interactions through the view.
For example, the flow of the message from one object to another can happen in 4 Ways.
- The View informs the Controller when a user interaction takes place
- The Controller updates the View when the data changes
- The Controller updates the Model when the data changes
- The Model notifies the Controller when data changes
In the context of app development, data flow can occur in two primary directions.
The first scenario involves a user-initiated action, where a user interacts with a screen element, triggering a sequence of events that flows from the View to the Controller and subsequently to the Model. This chain of events enables the app to respond to user input. (View -> Controller -> Model)
In the second scenario, the flow is reversed, and the sequence originates from the Model. When the data in the Model undergoes a change, the Controller is notified, and the updated information is then passed to the View, triggering a refresh of the user interface to reflect the new data. This bi-directional flow enables a seamless exchange of data between the app’s layers, ensuring a dynamic and responsive user experience. (Model -> Controller -> View)
Design
When developing an iOS application, there are unique design principles that differ from those of Android. To create an app that stands out from competitors and attracts users, following the design elements outlined below can enhance the app’s value and appeal.
Layout and Grid
When working in Figma, different artboard sizes are available for iPhone. Selecting an appropriate size can be challenging, but Xcode automatically adjusts the layout design to fit the selected device. Therefore, it is advisable to choose the artboard size for a popular iPhone model and design the UI based on its layout specifications. The image below demonstrates layout regions and specifications for the iPhone 14 Pro.
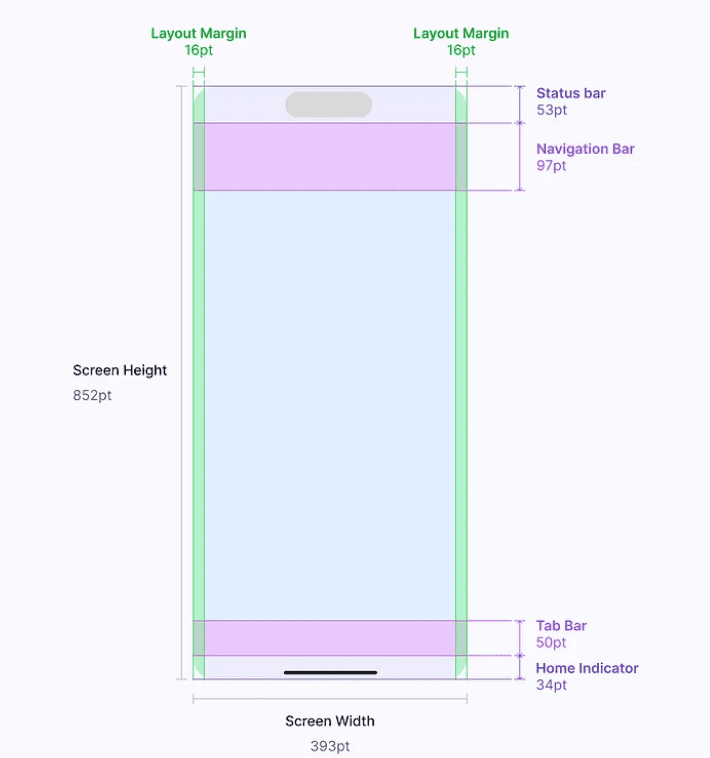
UI elements like buttons and controls should be placed in the areas not covered by the Status Bar and Home Indicator regions to prevent interference with interactive iOS system elements.
Grids are crucial for arranging content in a structured manner. Although commonly used in responsive website design, they are equally useful for mobile apps.
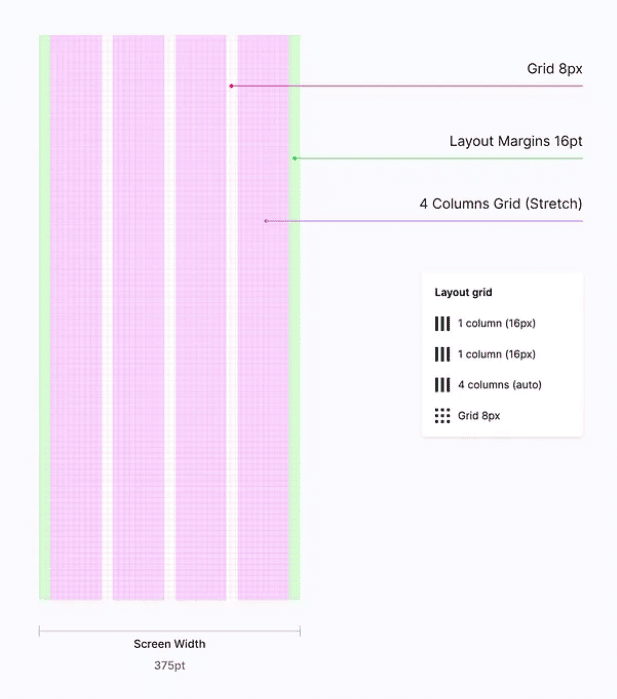
Defining a Grid for Mobile Apps
- Create an 8-point grid to precisely place elements on the screen.
- Set left and right margins to a minimum size of 16pt, which is standard for iOS.
- Define the number of columns optimal for the design needs. A gutter size of 16pt is most common; however, adjustments can be made as necessary. In stretch grids, the gutter size affects the column width; the larger the gutter size, the narrower the column width.
Colors
iOS includes a predefined set of system and semantic colors that adapt to vibrancy, accessibility settings, and appearance mode.
Semantic Colors
These are colors with names that describe their purpose. Each semantic color has variants such as Primary, Secondary, and Tertiary, which help differentiate content based on their level of hierarchy. For example, a custom color for a primary background could be named appPrimaryBackgroundColor, where app is a short name for the brand or app, and PrimaryBackground is the semantic name. Custom colors should not duplicate iOS system color names.
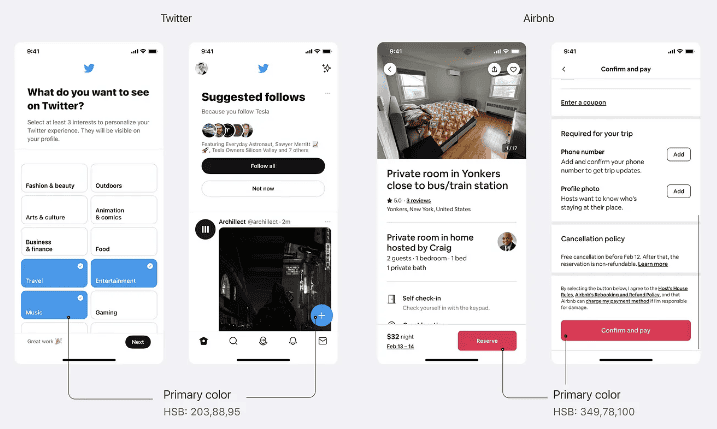
Primary Color
Represents the app’s personality and is used frequently across screens and components to indicate primary actions. It can also highlight specific UI elements or interaction states like Tap and Press.
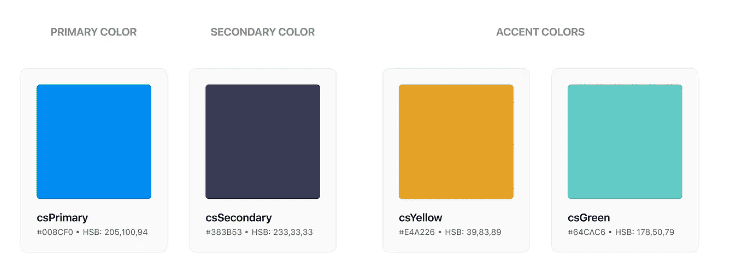
Secondary and Accent Colors
Secondary Colors support the primary color and add depth. And accent colors, considered part of the secondary colors, highlight important actions and controls. They are ideal for selection controls, highlighted text, progress bars, links, and headlines. Typically, an app should have 1 primary color, 1~2 secondary colors, and 1~3 accent colors.
Typography
Apple offers a set of built-in typefaces, including San Francisco and New York. San Francisco comes in several variants, with SF Pro being the standard version. Custom fonts can also be used, but there are several considerations to keep in mind:
- Legibility: Ensure the font is easily readable. Factors affecting legibility include character recognition, stroke width (thickness of the lines forming the characters), tracking (letter spacing), leading (line spacing), font sizes, and font styles.
- Font Limitation: Limit the number of typefaces and fonts in the app. Typically, using a maximum of two fonts helps maintain a simple and harmonious interface.
- Font Pairing: Consider how well fonts complement each other. Avoid pairing fonts that are too similar, as this can make them difficult to distinguish.
- Google Fonts: Utilize Google Fonts to preview different font combinations. Figma also provides ready-made Google Font type pairing palettes for convenience.
Font Styles and Sizes
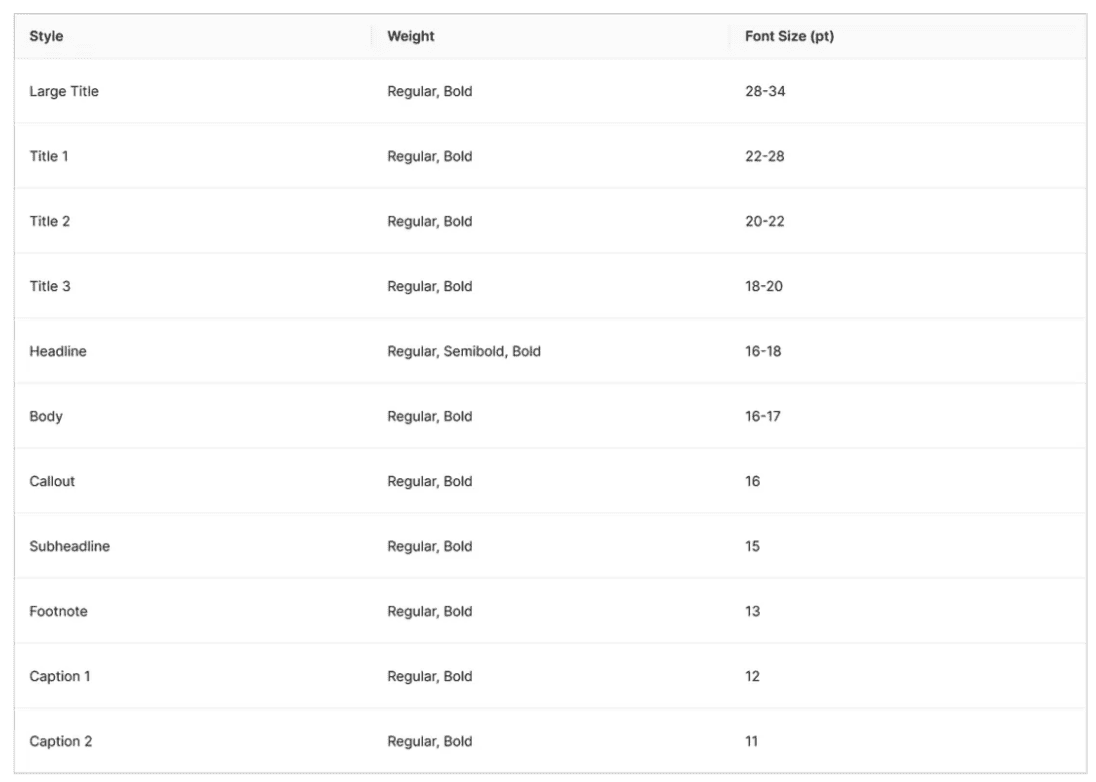
Different font sizes and weights are used to differentiate text styles, such as titles, headings, body text, and captions. iOS includes a set of predefined text styles, like Large Title, Title 1, and Title 2. Each text style has a default font size and dynamic type sizes associated with it.
Dynamic Type is an iOS feature that allows users to adjust the text size in their apps. When using custom fonts, it is crucial to define both default and dynamic type sizes in the code to ensure users can adjust text sizes according to their preferences.
The following table can be used as a guide for selecting default font sizes for custom font styles.
Text Layout
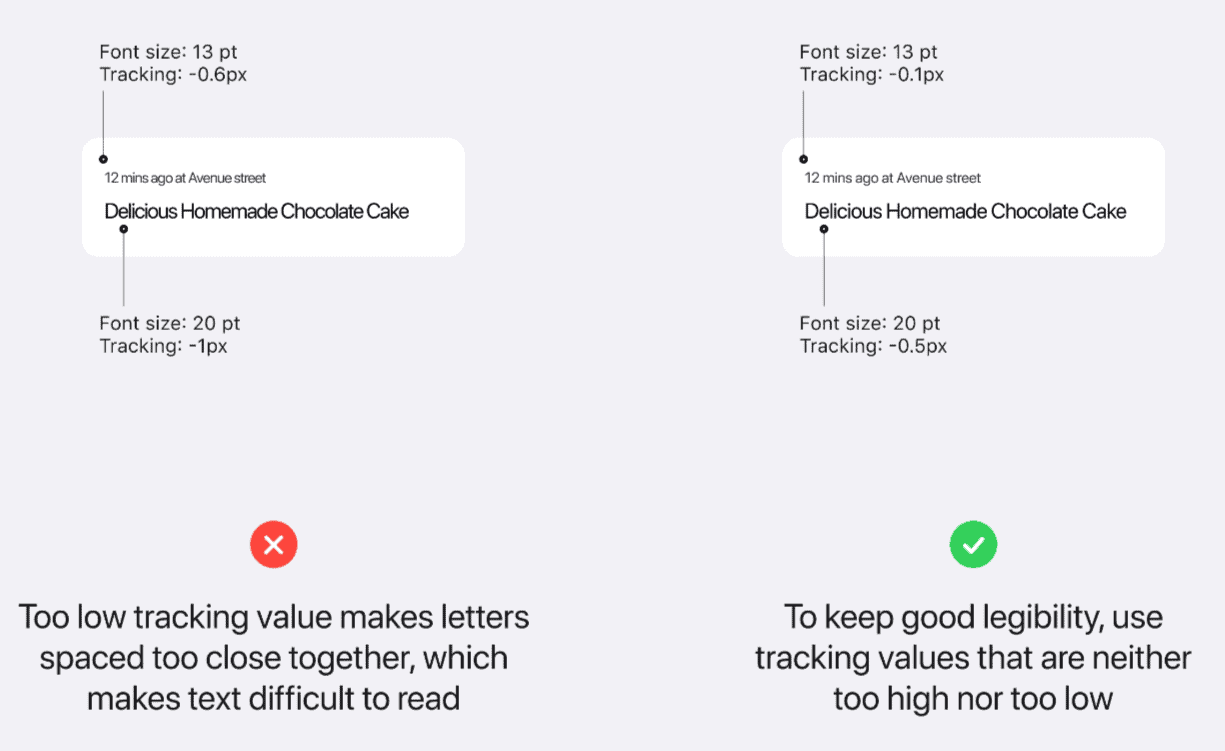
Adjusting tracking and leading is essential for fine-tuning text layouts to achieve optimal readability and legibility.
- Tracking is the spacing between glyphs. In CSS, this property is referred to as “letter-spacing,” making the terms synonymous. To achieve good readability, it is recommended to increase leading, or line-height. Figma suggests setting the line-height to at least 1.125 times the font size (112.5%), though this can vary depending on the typeface. For instance, Apple sets the minimum leading for body text (SF Pro font) at 129% (22 pt), but recommends increasing it to 141% (24 pt) for better readability in longer paragraphs.
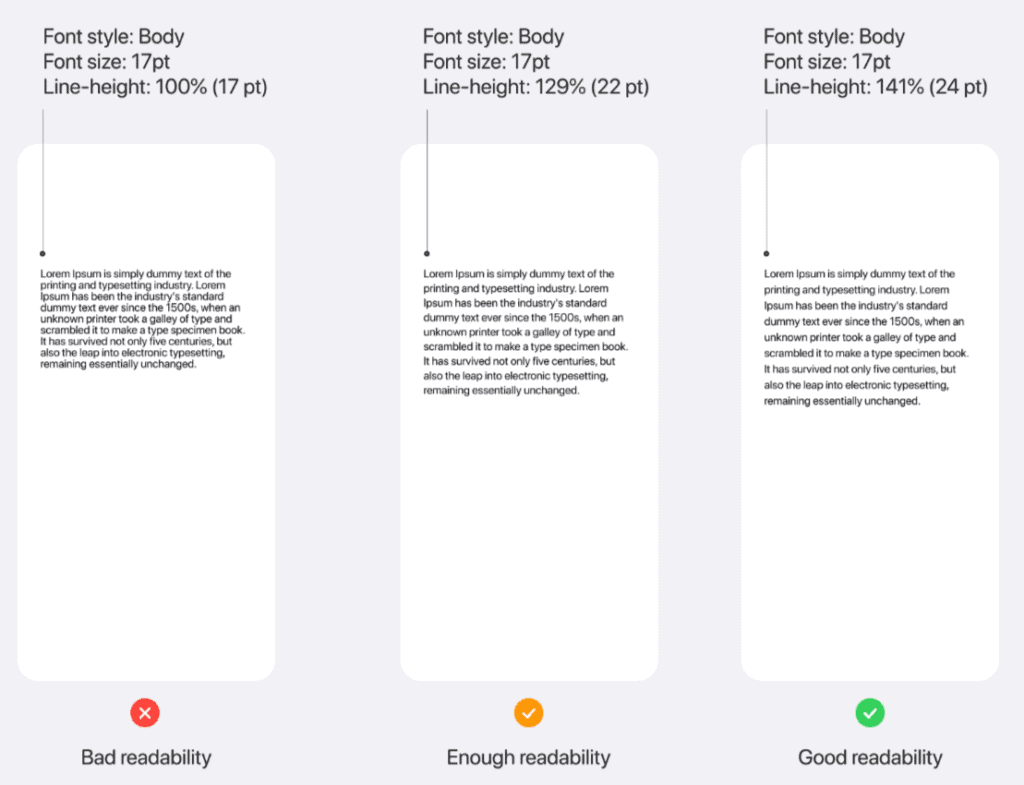
- Leading is the spacing between lines of text, referred to as “line-height” in both Figma and CSS. Adjusting line height can significantly enhance readability and is measured from one baseline to the next. To maintain good readability, it is advisable to avoid tracking values that are excessively high or low relative to the font size. Refer to Apple’s tracking table for optimal tracking values for the system font.
Components
iOS offers a comprehensive library of various components, all of which are detailed in the documentation. This section focuses on three widely-used components—List, Tab Bar, and Navigation Bar—found in nearly every iOS mobile app, highlighting the best practices for each.
Lists and Tables
Lists and tables are essential for displaying collections of items, which can include text, icons/images, or a combination of text and selection controls. For example, utilizing a different color for the overall background can create a clear visual distinction between the background and groups of content. Additionally, avoiding the use of similar font styles for the heading and table row titles helps users differentiate between content groups.

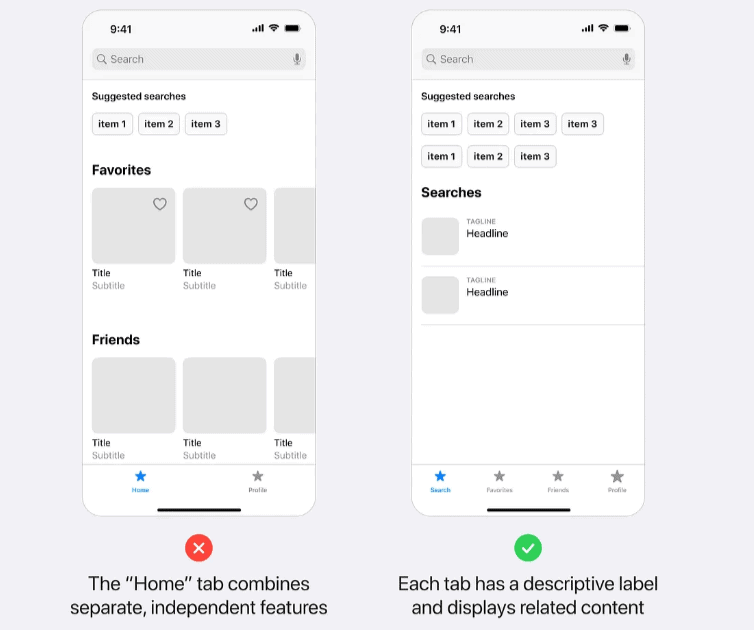
Tab Bar
A tab bar serves as a global navigation control, allowing users to switch between different views within an app. Each tab should be meaningful and descriptive. For example, avoid grouping unrelated content within a single tab, such as “Home” or “Overview.” A tab named “Home” that combines unrelated features like “Search,” “Favorites,” and “Friends” can confuse users and make it harder to find specific features. Instead, separate content into distinct tabs by identifying key features and sections, grouping only related content within each tab.
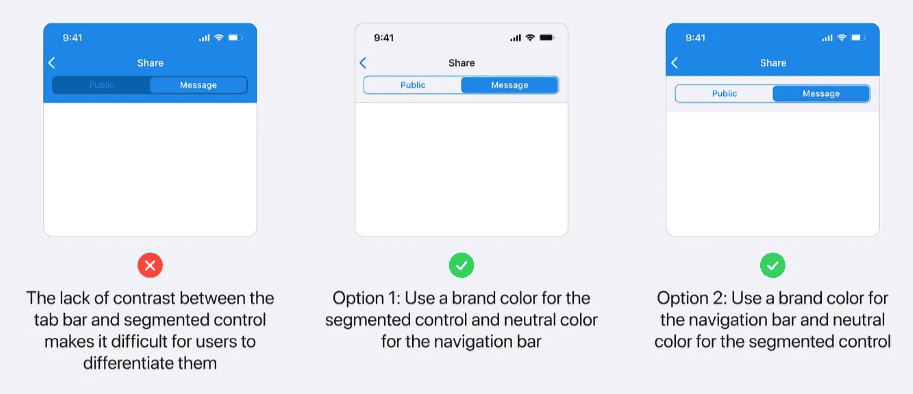
Navigation Bar
The navigation bar is a crucial navigational control that allows users to traverse the hierarchy of an app. For example, ensure sufficient contrast between the navigation bar and other elements, such as filters and segmented controls, to maintain clear visibility and usability.
By adhering to these guidelines, designers and developers can create intuitive, user-friendly interfaces that enhance the overall user experience of an iOS application.
Testing and Quality Assurance
Releasing a mobile app without thorough testing is comparable to launching an unfinished product. While few apps are perfect upon their initial release, many at least achieve the status of a minimum viable product (MVP). Importantly, these apps undergo multiple rounds of testing prior to publication.
Several platforms exist for testing native and hybrid mobile apps, with some specific to iOS. Apple provides a free method for developers to test their apps through TestFlight. Additionally, web-based apps should also be tested, though the method differs as they are not published on the App Store.
Importance of Testing Your App Before Release
Testing an app before release ensures that all features function as intended. This includes evaluating usability and assessing the app’s stability. While developers can conduct initial tests, involving other users can help identify unanticipated issues or overlooked aspects.
Not all users will have the latest software release or the newest phone model. Large-scale testing can reveal issues specific to certain phone models or operating system versions.
It is common for app developers to optimize their apps for recent phone and operating system releases, typically covering devices from the past three to four years.
Testing an iOS App Using TestFlight
TestFlight supports up to 10,000 external users for testing an app, with different users able to test various builds. Each build remains available for 90 days after its initial upload. The App Store will review the first build added for external testers to ensure compliance with the App Store Review Guidelines. Testing can commence once the app is approved.
Testers can provide feedback directly through the TestFlight app, including screenshots to illustrate any issues encountered. If crash reporting is enabled, the system prompts testers to send details of any crashes to the developer.
Important Considerations When Testing Your App
When using TestFlight for app testing, it is important to note that the identity of testers may not always be known. Testers have the option to submit feedback without including their email addresses. However, critical information such as the device model and iOS version used by the tester will be available, which can be invaluable for troubleshooting and improving the app.
Providing testers with a clear understanding of the app’s purpose is crucial, even if it seems self-evident. Additionally, instructing testers to perform specific tasks can yield more comprehensive feedback. For example:
- Create an account and update the profile.
- Use Facebook, Apple, or Google for signing in if these options are integrated into the app.
- In e-commerce apps, ask testers to locate specific items, add them to the cart, and complete the checkout process.
- Test all features of the app, with particular attention to those that interact with phone and operating system functions, such as the calendar, camera, and photo gallery.
Ensuring testers are well-informed about these tasks can help identify issues that might not be evident through internal testing alone, ultimately leading to a more robust and user-friendly application.
Deployment
Code Signing for iOS Distribution
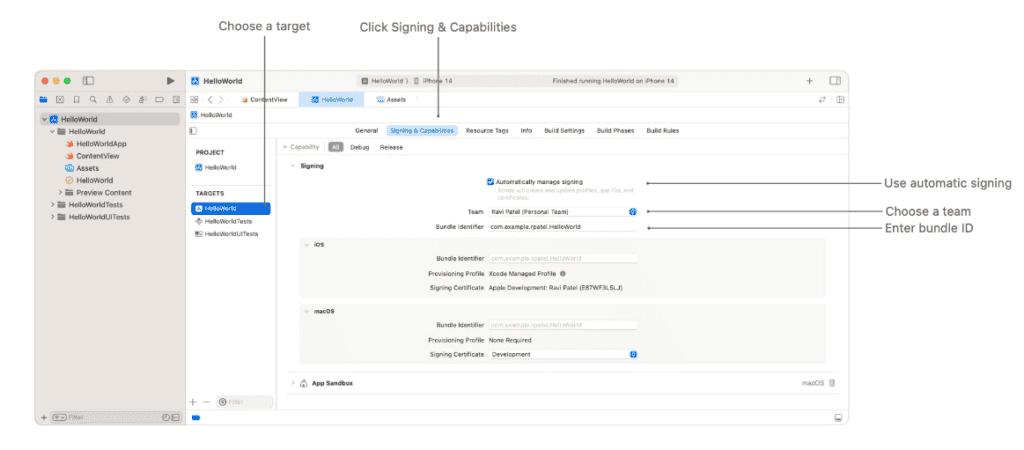
Before releasing an app to the App Store, developers must follow a specific process to ensure a successful submission. To distribute an iOS application to beta testers or through the App Store, it is essential to create a distribution provisioning profile and a distribution certificate. The development provisioning profile and certificate used for specific devices are not suitable for wider distribution.
Xcode provides a straightforward method for managing this process. When automatic signing is enabled, Xcode handles the creation and management of certificates, signing identities, and device registration. If automatic signing is already enabled, or if manual signing is preferred, it is possible to skip to the next steps.
Setting Up App Store Connect for Your App
Creating an App Store Connect Record
To distribute an app via the App Store, it is necessary to create an App Store Connect record. This can be done by:
- Creating a new App Store Connect organization and becoming the team agent by signing in with the Apple ID used to enroll in the Apple Developer Program.
- Being invited by an existing organization as a user with an Admin, Technical, or App Manager role. More details about App Store Connect user accounts can be found on Apple’s official documentation.
For Paid Apps
When submitting a paid app, it is necessary to sign a contract that outlines the terms of payment. This step can be skipped for free apps.
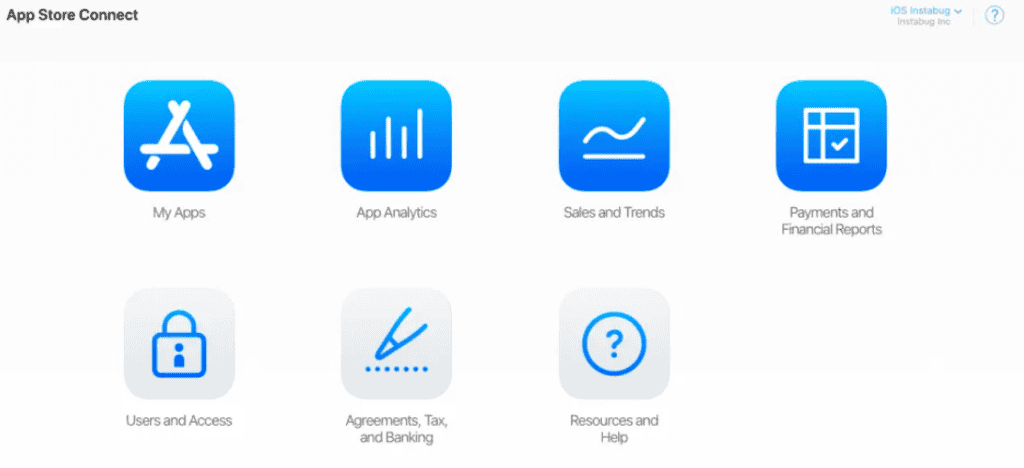
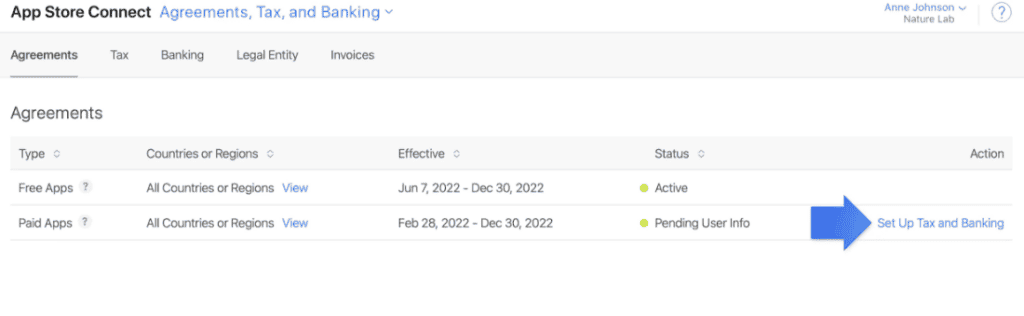
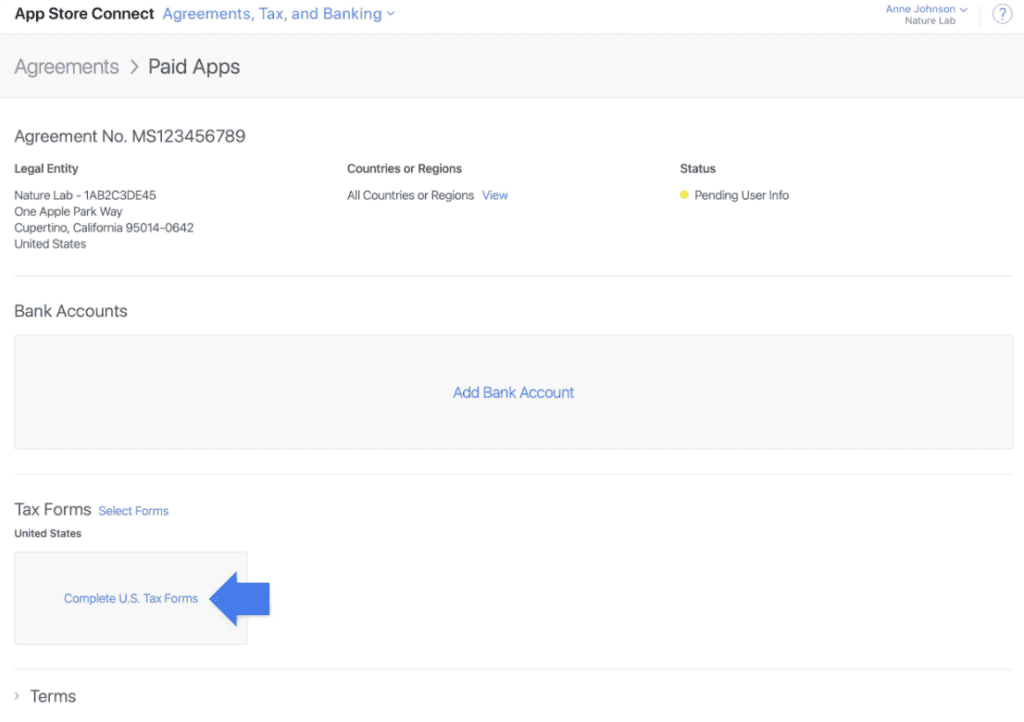
- Access the App Store Connect dashboard and select Agreements, Tax, and Banking.
- From the “Paid Apps” section, select View and Agree to Terms from the actions column.
- Review the agreement, check the box to agree to the terms, and click Agree.
- The action in the paid apps section will change to Set Up Tax and Banking. Click on it.
- On the paid apps agreement page, click Add Bank Account and enter the required information.
- In the “Tax Forms” section, click Select Tax Forms and add the tax forms for applicable countries. A U.S. tax form is mandatory for all developers.
7. Complete the selected tax forms in the “Tax Forms” section.
Once these steps are completed, the agreement’s status will change to “Processing”. After Apple verifies the information provided, which typically takes about an hour, the agreement’s status will update to “Active”.
Adding a New App
To add a new app in App Store Connect:
- Navigate to the App Store Connect dashboard and select My Apps.
- Click the + sign in the upper left-hand corner and select New App.
- To create a new entry in App Store Connect, the following details are required: platform, app name, primary language, bundle ID, and SKU. These details cannot be changed later, so ensure they are correct.
- App Name: Use keywords in the app name to enhance discoverability.
- Bundle ID: Must exactly match the bundle identifier in the Xcode project’s Info.plist file (in the target’s General > Identity section).
- SKU: An internal identifier chosen by the developer. It can include letters, numbers, hyphens, periods, and underscores, and must start with a letter or number. This identifier is not visible to users.

Archiving and Uploading Your App Using Xcode
Although it is possible to upload an app bundle directly to App Store Connect, this guide outlines the steps required to upload the build through Xcode.
- In Xcode, set the deployment target to Generic iOS Device.
- From the top menu, select Product and then click on Archive.
- The Xcode Organizer will open, displaying any previously created archives.
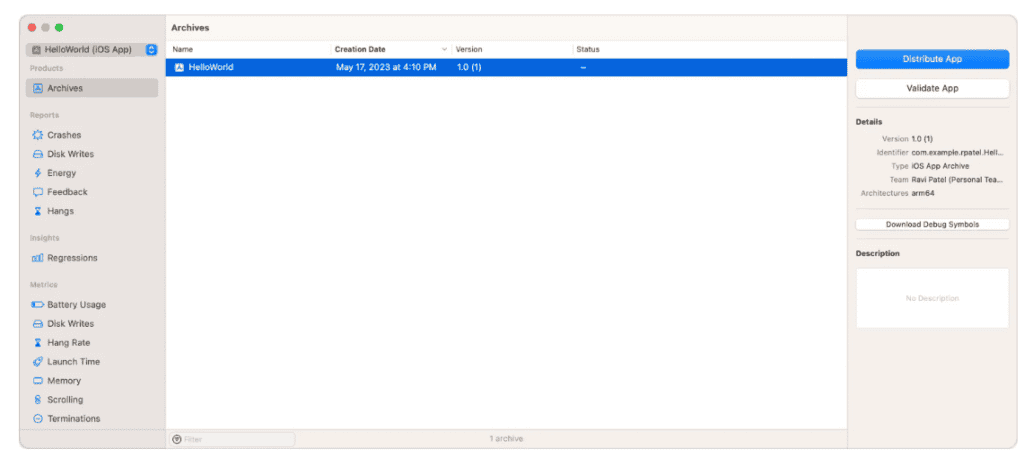
- Select the desired archive and click on Distribute. This will prompt a choice of distribution methods.
- Ensure the current build is selected in the sidebar and choose TestFlight & App Store.
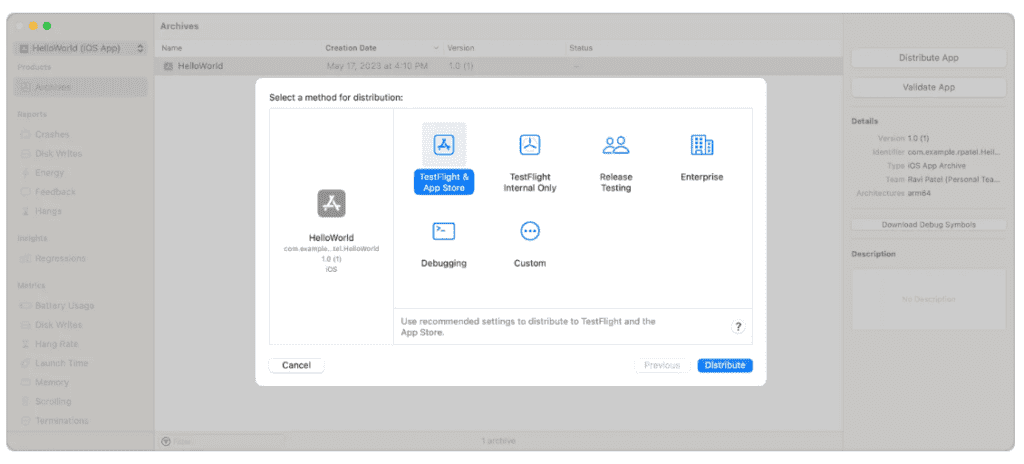
- Click on Distribute at the bottom right corner of the window and then select Upload on the subsequent page.

- On the next page, options will be available for uploading app symbols and managing build and version settings.
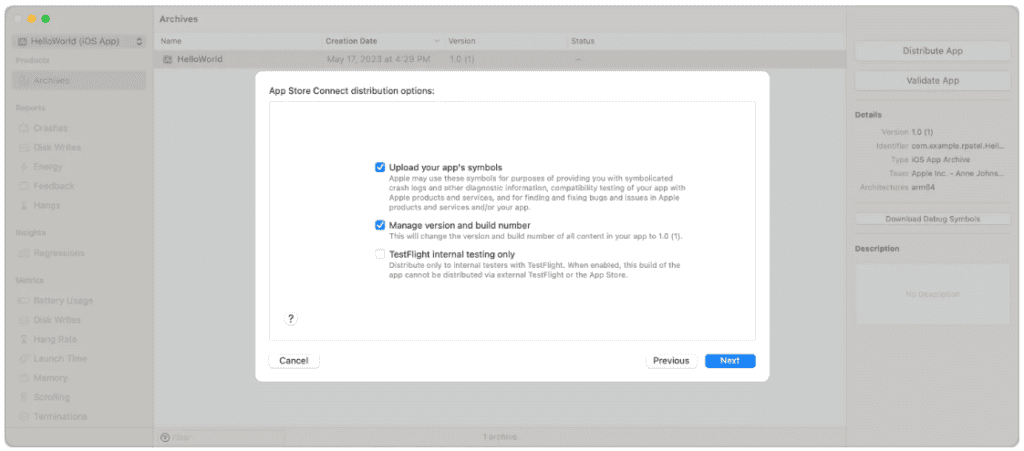
8. Finally, click on Distribute in the following window to complete the upload process.
By following these steps, the app can be successfully archived and uploaded to App Store Connect using Xcode, ensuring it is ready for distribution through TestFlight or the App Store.
Setting Up Metadata and Additional Details
Within the App Store Connect interface, under the “App Store” tab, there is an “App Information” page where additional languages, categories, and the app’s Privacy Policy URL can be added.
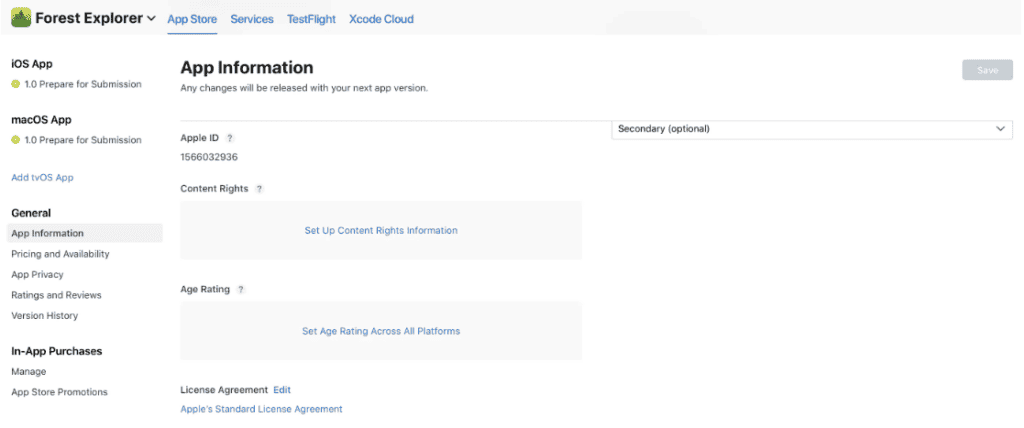
On the “Pricing and Availability” page, the app can be set as free or assigned a price tier.
In the “Features” tab, configurations for any App Store technologies integrated into the app, such as Game Center and in-app purchases, can be added.
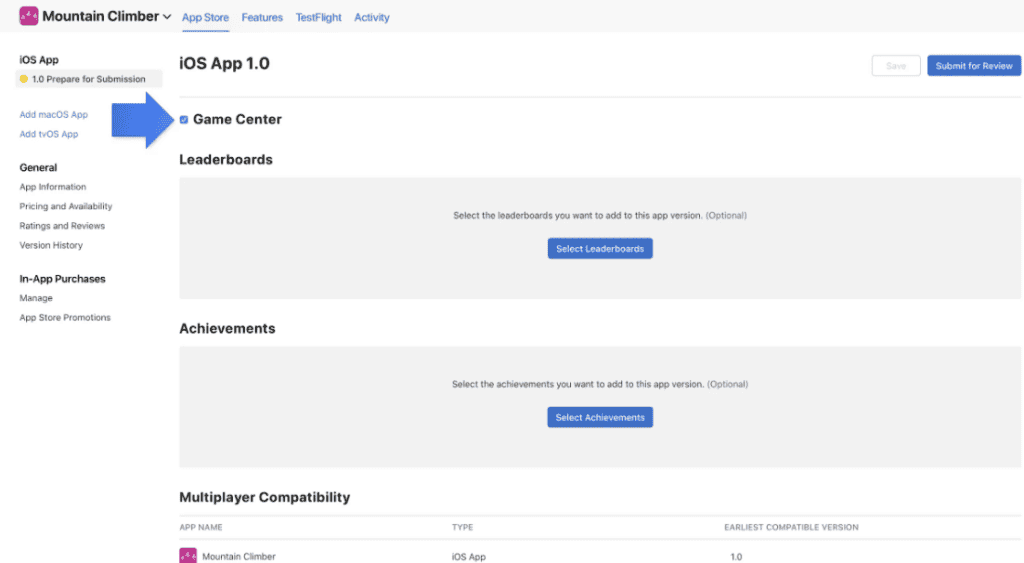
At this point, the app will display a yellow dot and the status “Prepare for Submission” in the left-hand panel under “App Store.” Select the build to configure and provide the necessary information for the product page on the App Store.
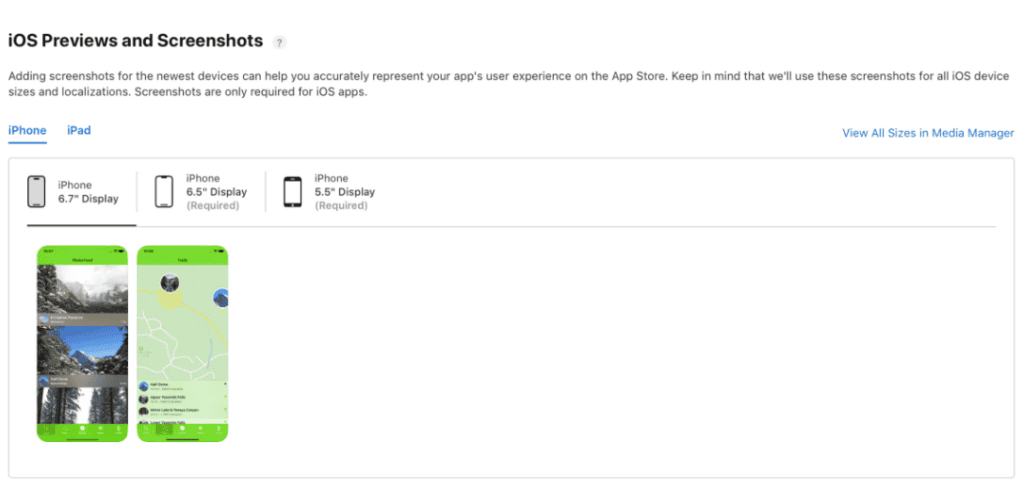
Uploading Screenshots and Additional Information
Upload the app’s screenshots in JPEG or PNG format without status bars. A single set of screenshots can be used across various device sizes.
Enter the app’s description, keywords, support URL, and marketing URL. These elements are crucial for app discovery and user support. The support URL can be a simple landing page with a contact form, while the marketing URL, which is optional, can be the app’s website.
In the “General App Information” section, upload the app icon, and enter the version number, copyright, and contact information. The app icon should be 1024px x 1024px. The version number must match the one used in Xcode. The copyright information typically follows this format: “Copyright (c) 2017, Instabug, Inc.” The contact information provided here will be visible to users.
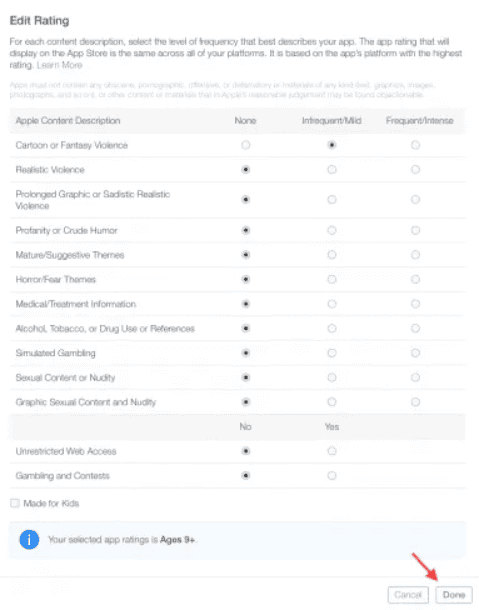
Setting the Rating and Review Information
Click on Edit next to “Rating” and select the appropriate options for the app. It is important to be honest, as discrepancies can lead to rejection during the review process.
In the “App Review Information” section, provide contact details for the reviewer, any notes regarding specific hardware requirements or user account information needed for access, and set the version release date. For initial releases, the version release date is typically set to automatic.
Once all necessary information has been entered, click Save in the top right-hand corner. At this stage, the app is nearly ready to be submitted for review.
Submit the App for Review
In the App Store Connect record for the app, navigate to the “Build” section.
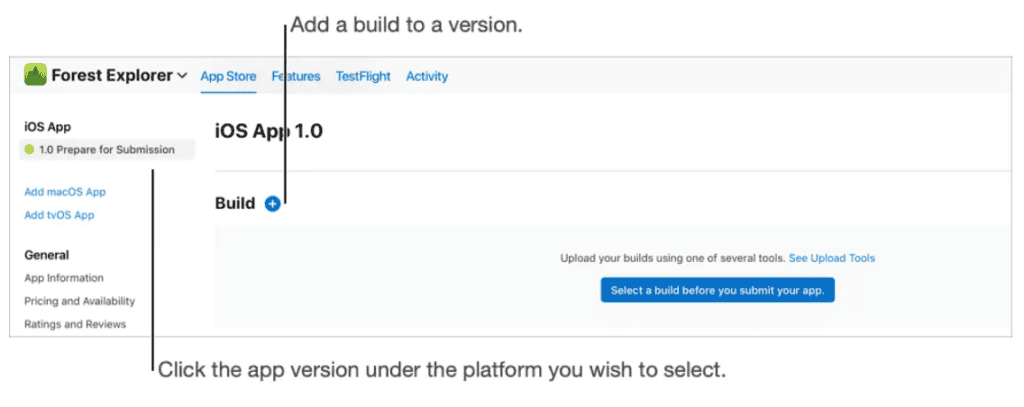
Select “Choose a build before you submit your app.”
Pick the build that was uploaded through Xcode. Click Done in the bottom right-hand corner, then Save in the top right-hand corner, and finally, select Submit for Review.
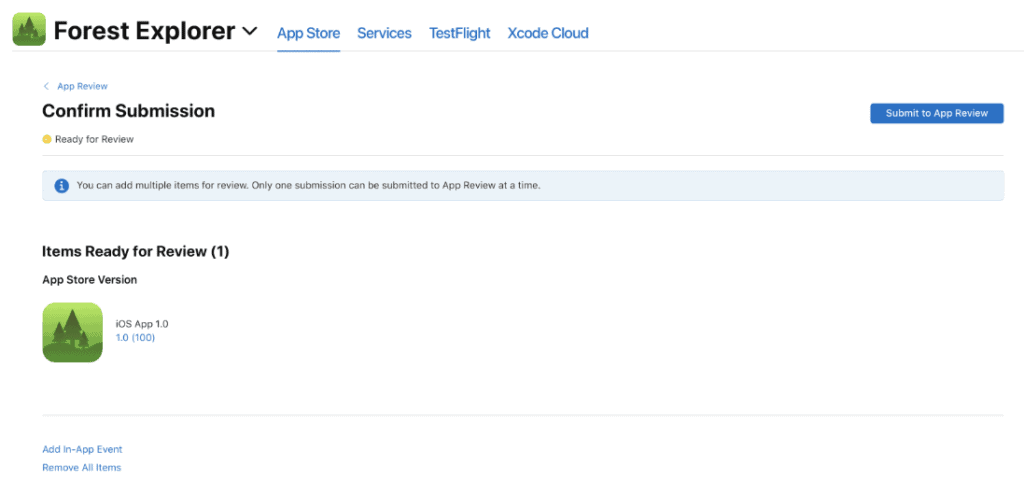
Next, respond to the questions regarding Export Compliance, Content Rights, and the Advertising Identifier, and then click Submit.
The app’s status will now change to “Waiting For Review.” At this stage, the app may either be approved or rejected. If approved, the app will be successfully deployed on the App Store.
Maintenance
Ensuring an app’s success involves more than just launching it—it requires ongoing maintenance and enhancement. Once an app is released and in the hands of users, feedback starts to come in, both positive and negative. Constructive criticism is invaluable as it offers insights into areas needing improvement. It’s likely that for every user providing feedback, many others share the same thoughts but don’t voice them.
Improve apps from feedbacks
The success of an app hinges on ongoing enhancement. Once an app is released and in the hands of users, feedback begins to pour in – both positive and negative. Constructive criticism should be embraced and valued, as it provides valuable insights into areas for improvement. It’s likely that for every user who takes the time to provide feedback, there are many more who share the same sentiments but opt not to voice them.
Post-launch support is crucial, and app developers should demonstrate a commitment to ongoing improvement. By regularly releasing bug fixes, new features, and updates, developers can build trust with their user base and establish a competitive edge over apps that fail to prioritize user feedback.
To maximize the collection of user ratings and feedback, developers can leverage tools like SKStoreReviewController. This feature, provided by Apple, facilitates the feedback process by prompting users to submit App Store ratings and reviews. Straightforward to install, SKStoreReviewController is a valuable resource for app developers seeking to enhance their apps and improve user satisfaction.
By prioritizing user feedback and continual improvement, app developers can ensure their apps remain competitive and meet evolving user needs.